Audio engineer types and home recording enthusiasts have been aware of PreSonus and their gear for decades with a deep offering of excellent audio interfaces, studio monitors, control surfaces, their much-loved Studio One recording software, and more.
Now the company is hoping that live streamers and podcasters will take notice of their new streaming-focused equipment, starting with the PreSonus Revelator USB Mic. While the competition is heating up in this category, PreSonus hopes to bring its established audio production knowledge into the streaming game.
Disclaimer: PreSonus sent us a Revelator USB Mic for evaluation and review purposes, but our opinions are our own. PreSonus does not have any editorial control over our article nor have we been compensated for a positive review.
Contents
What is the PreSonus Revelator USB Mic?
- Voice effects processing onboard with 8 professionally-crafted and easy-to-use presets. Choose from presets such as: Broadcast, Female Vocal, Space Overlord, Screamer, Slap Echo, Android, AM Radio, as well as standard Reverb and Delay. 8 Additional Preset slots available so you can create your own sounds.
- Onboard control for headphone volume, mic gain, mute, and preset switching and the included UC Surface software mixer to access all of the same controls and more on your computer
- 6-in/6-out audio interface | 1 dedicated microphone stream for analog recording | 2 dedicated output for headphone monitoring | 4-in/4-out virtual streams for application-to-application recording and playback with loopback options for macOS and Windows
Last update on 2025-06-30 / Affiliate links / Images from Amazon Product Advertising API
The PreSonus Revelator USB Mic is a front-address condenser mic aimed at the live streaming market where users need more than just a mic or an interface. The Revelator adds a considerable amount of extra features in the form of effects and other post-processing tools that help streamers get better quality audio in their broadcasts.
In addition to having a mic (and an audio interface) you also need post-processing on your audio signal in order to make it sound the best. This would be done with tools such as equalizers, compressors, limiters, noise gates, and so on. You won’t get the sound you’re looking for without these tools.
Update: PreSonus has released a dynamic version of this mic, cleverly called the Revelator Dynamic. We’d suggest checking out our review on it as we definitely have some thoughts about this new mic.
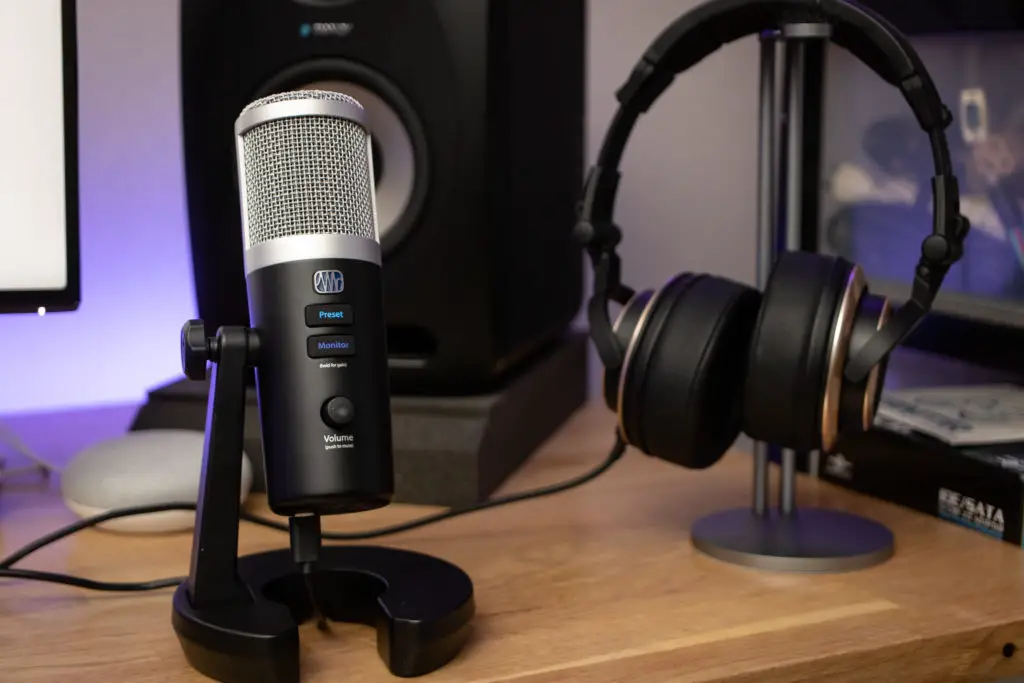
Essentially, the Revelator aims to put those post-processing tools and effects at the fingertips of an everyday live streamer without having to build this toolkit yourself along with presets that are provided to jumpstart your quest for good tone.
Yes, you could absolutely stack up VST plugins in OBS and do this all yourself. But as someone who has audio engineering experience, when providing advice to someone who does not have said experience, having those presets and easy-to-learn tools in one easy-to-access place is absolutely a great arsenal for people who don’t want to learn.
What makes the PreSonus Revelator USB Mic great?
The Revelator is everything you need for a live streaming mic in one package–interface, mic, volume control, preset controller, and software mixer. This mic is a versatile tool in any streamer’s (or podcaster’s, or work-from-homer’s) arsenal. The only thing it doesn’t come with is a pair of headphones, but you do have a headphone jack with volume control and zero-latency monitoring.
Do you need different pickup patterns for different purposes (capture a whole room or an interview with someone across the table from you)? There are three to choose from–cardioid (directional), figure 8 (front and back), or omnidirectional (360-degree coverage).
If you stream or record with not just voice, but also game audio, voice chat or video chat streams, or other audio sources, there are two sets of stereo loopback devices built into the Revelator. This eliminates the need for extra software options like Voicemeeter and does everything with the PreSonus software, including audio mixing and routing duties.
You’ll find some pretty good sounding effects presets, such as EQ, compressor, gate, and limiter–normal tools of the audio production trade. But there are also some voice effects and reverb, even if you may not use these very often.
The whole Fat Channel aspect is pretty dope, though, and makes it pretty easy to get a solid and quality sound out of the mic with minimal effort. You can tweak the “signal chain” with the effects into a preset once you get the tone that best fits you–there are 8 user presets available for you.
Speaking of presets, you can actually switch between up to 4 of those presets from the mic itself with the Presets button on the mic. You can cycle through and choose your presets without having to dive into the software. You also have access to zero-latency monitoring and mic/headphone volume controls as well.
But if you need to use all 8 presets you can use the included Universal Control Surface software. This will let you have more control over those presets as well as control your virtual audio device mixes (Skype, Discord chat, games, DAW, etc).
Revelator physical features and build quality
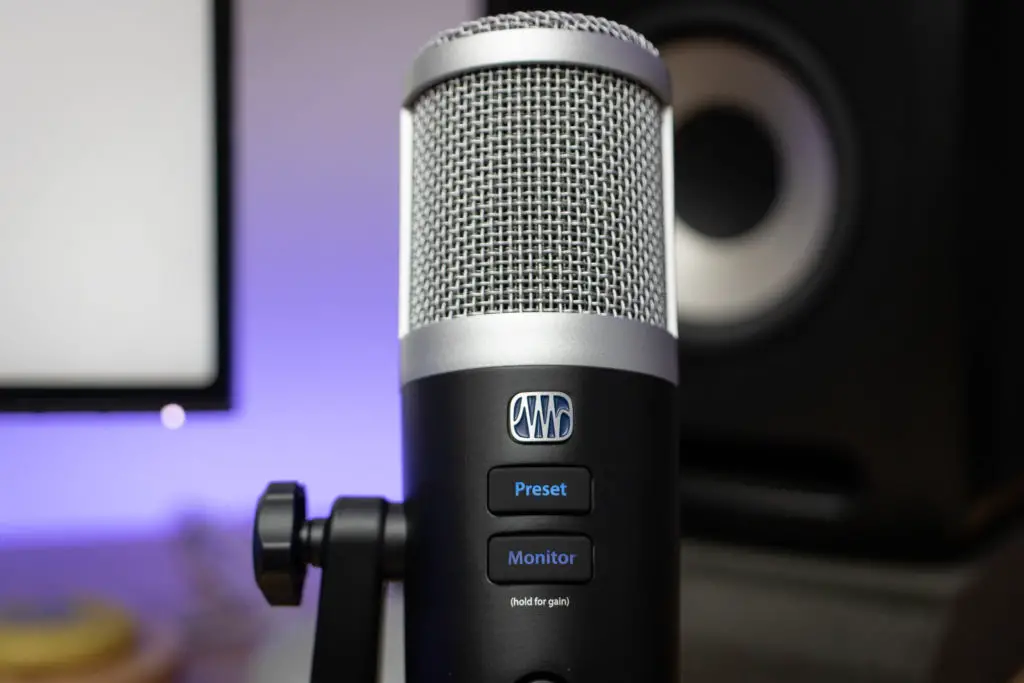
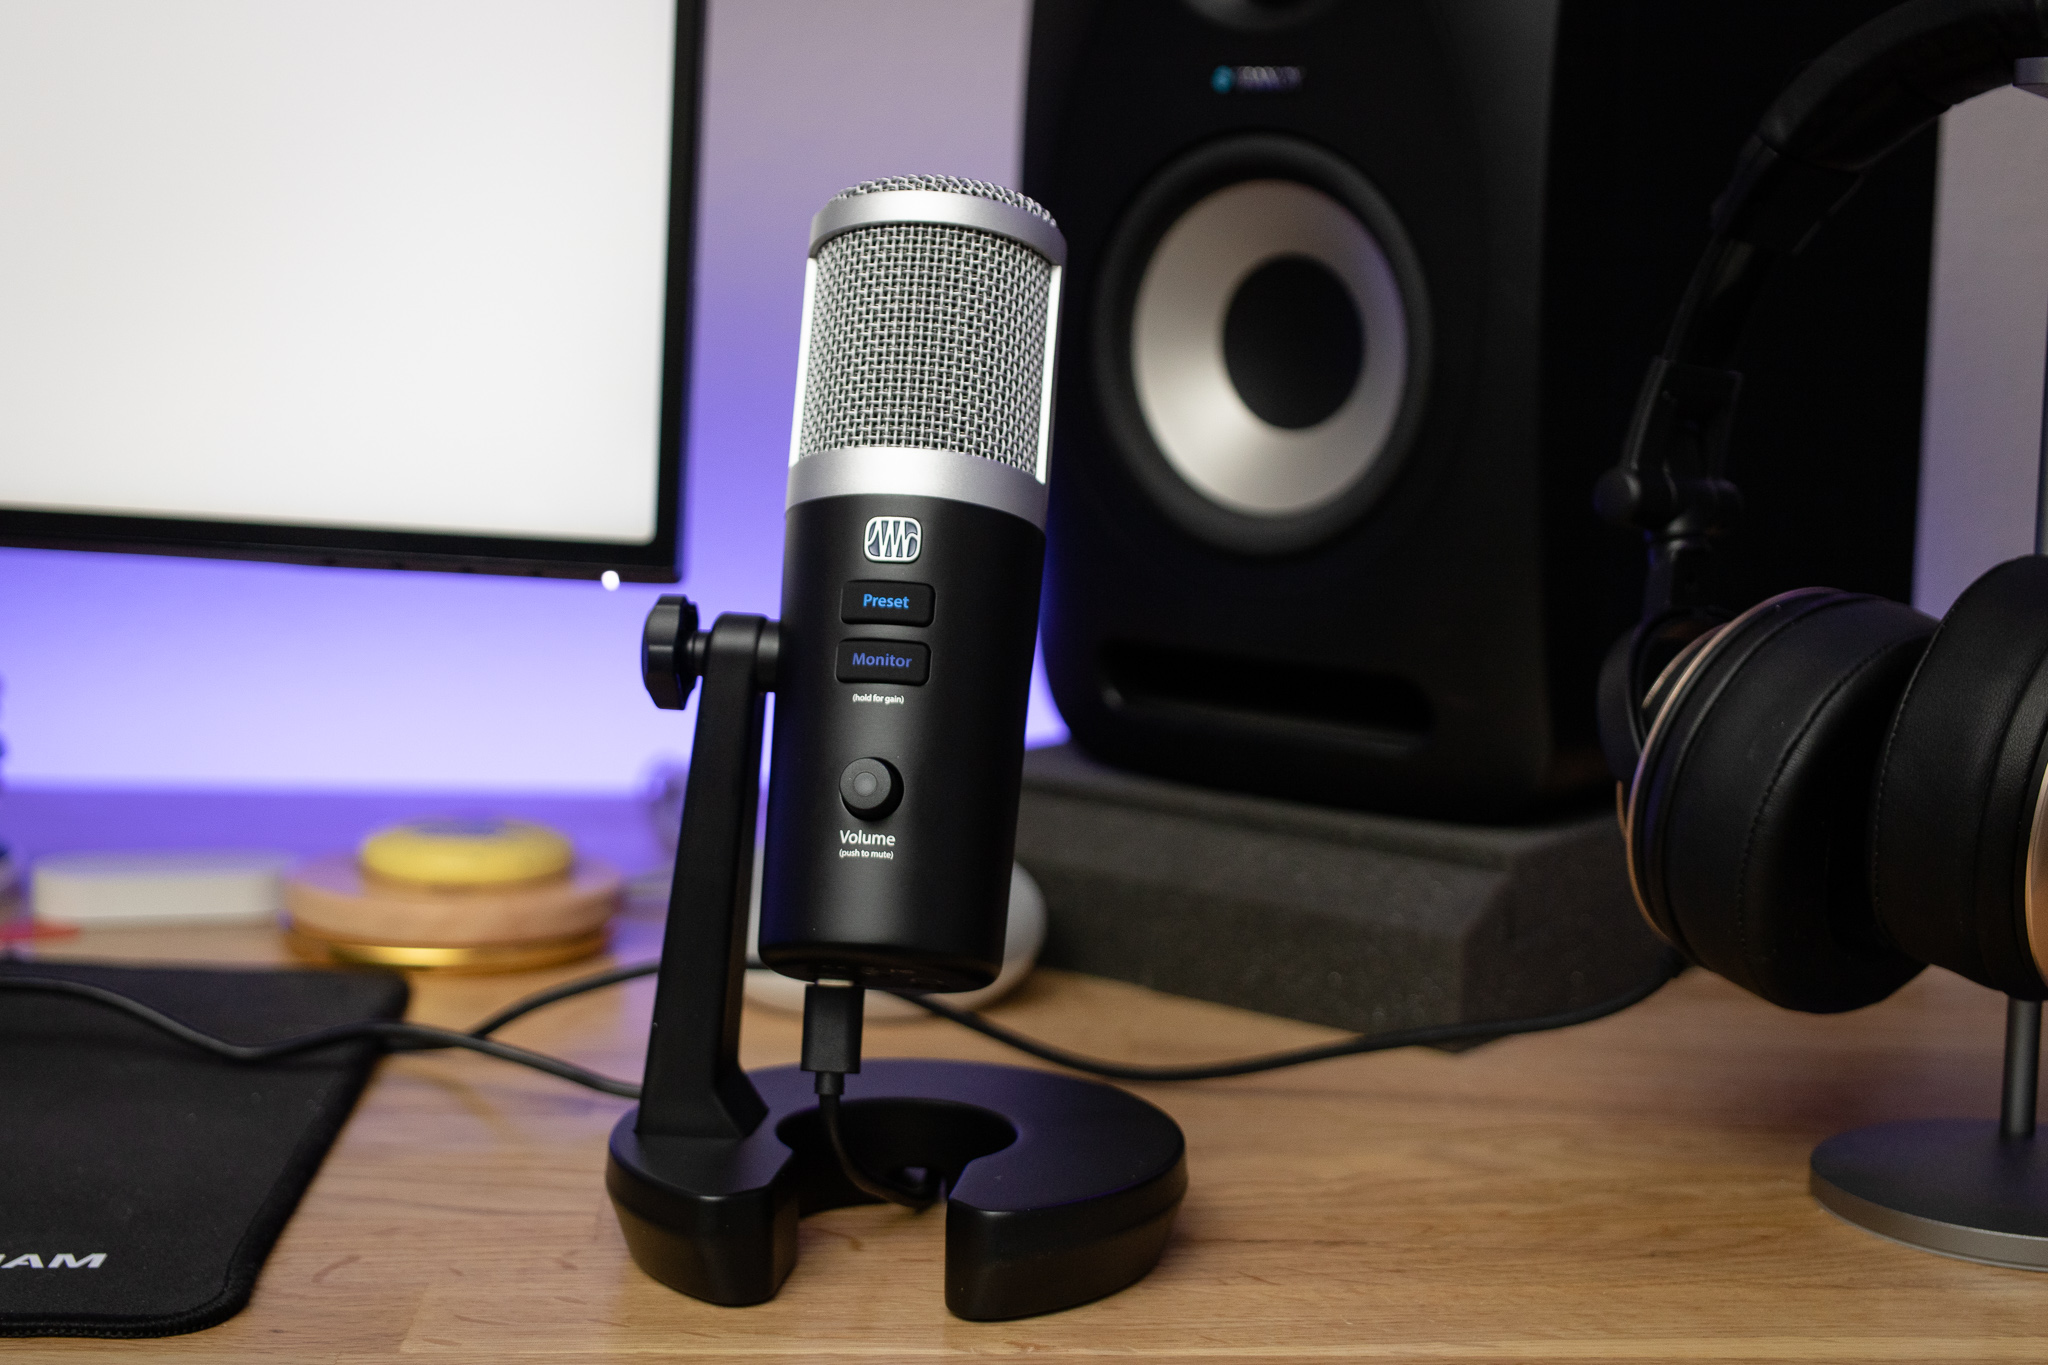
Overall, the construction of the Revelator is fairly solid. The mic has a metal body and mesh grill and feels decent. The base that comes with the mic is weighty and does a good job of keeping the mic on the desk, but doesn’t have any shock-absorbing mechanisms either on the mic or the base.
There are only a few controls on the mic–two buttons and a volume knob that is also a button. The buttons aren’t super clicky but have decent feedback. The volume knob feels a little loose and off-center on our copy, but adjusting levels is easily done regardless.
If you don’t want to use the Revelator on its included base, you can attach the mic to any mic stand or boom arm using the mic stand adapter, also included. While it’s not the most elegant solution, it’s always better than not being possible at all.
One thing we did notice is that, when using the stand adapter, there’s a bit of a tight fit when plugging headphones into the 3.5mm output. If your mic stand has a collar like ours do you may have a bit of a squeeze to get the headphone jack in there.
We’d like to see this moved around in future versions, but we’d also like to see full-size threading for a stand instead of needing an adapter.
That said, we’re absolutely thrilled that the Revelator has a USB Type-C connector, which is always the right choice.
PreSonus Revelator software
PreSonus bundles their Universal Control software, which handles both the audio interface settings as well as the channel strip, effects, and preset control. The software is mostly pretty intuitive but there are a few points where there can be some improvement.
Audio interface settings
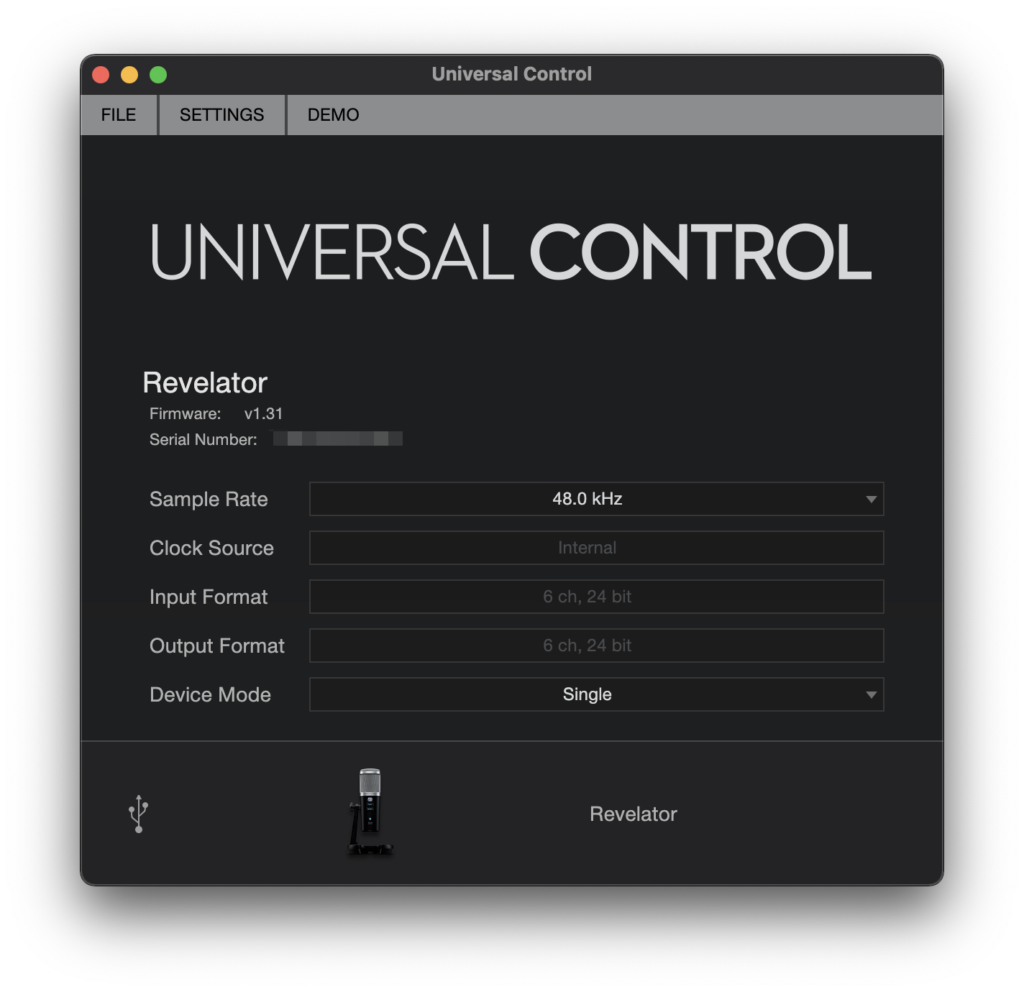
The main settings screen has your sample rate, Device Mode (macOS only, unfortunately), and some other options to choose from.
Device Mode will be where you can set it to Multi Mode. The mic will then work as three separate stereo devices–Revelator, Revelator Loopback 1, and Revelator Loopback 2. This allows you to have separate audio sources, such as a Zoom or Skype call or streaming gameplay routed into your mix.
Once in Multi Mode, while you’ll have easily routable stereo sources, it isn’t assignable as normal within a DAW, so keep that in mind.
It should be noted, however, that in Multi Mode you can only use the 44.1 kHz and 48 kHz sample rates. In order to get 88.2 kHz and 96 kHz, it needs to be in Single Mode.
The Settings menu at the top of the Universal Control settings screen is also where you can check for firmware updates–always a good thing to do to ensure stability and compatibility.
Revelator mixer panel
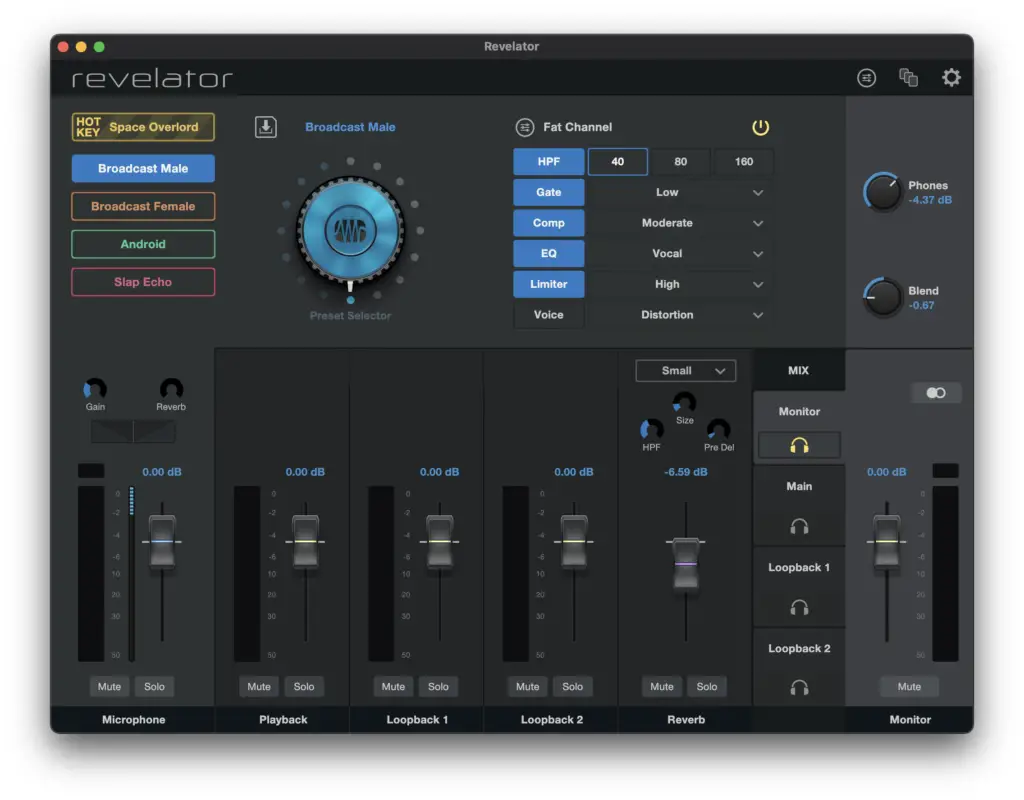
We really like the layout of the mixing panel in Universal Control. It’s laid out in a way that really makes sense and puts all the most important features right upfront.
Preset controls
At the top left, you have your main four presets (triggerable from the Preset button on the mic itself) in their color-coded outlines, along with the hotkey preset. If you plan on doing all your adjustments from the mic itself, this is where you line that all up.
To the right of the preset column is a big selection knob. The dark blue dots on the left half are the 8 factory presets, and the grey dots are the 8 user presets (these turn yellow when selecting a user preset slot that isn’t empty). To be honest, the knob is a bit difficult to use, as the mouse selection will just release at random. It’s easier to click the preset name above the knob and use the drop-down list.
Channel strip panels
To the right of the preset knob are the Fat Channel settings and the main enable/disable button. This is where you can turn Fat Channel along with engaging or disengaging any of the channel strip components within the channel.
If you need to disable EQ or change the limiter strength you can do it from this section. There’s further control in the advanced section which we’ll get to momentarily, but this is the easiest option for most users who aren’t already well-versed in audio engineering concepts.
At the top right corner are the headphones and blend knob, allowing you to mix your headphone output between computer playback and zero-latency monitoring. And while you can control your headphone volume from the mic, you can also do it here.
Channel faders
The bottom half of the panel are the channel faders. The main microphone channel is on the left, with gain control and reverb send up top, a pan control next in line, and a meter and fader for output level in your mix.
The Playback channel is next and is basically the output channel for the Revelator in each mix, followed by Loopback 1 and Loopback 2 as those virtual devices. Again, each of these can be set in each mix independently.
There’s a reverb strip next, which gives some great control over your desired reverb. You can change the room size with the dropdown or manually fine-tune with the Size control, adjust the high-pass filter and even control pre-delay.
Once you have the reverb character set you can set your return reverb independently from the dry mic output to get the right blend. Not that reverb is used very often by streamers other than for jokes or emphasis, adding a tiny, minuscule amount of reverb can do wonders to fatten up a vocal tone, so we’re glad to see it’s there.
Mix busses and monitor out
The last main panel is reserved for setting your final mixes. You have four mix busses–Monitor, Main, Loopback 1, and Loopback 2. Most of the time you’ll be concerned with the first two.
You can click the mix bus to configure, set your levels and then move on to the next. Whichever bus has the yellow headphones icon is the one sent to your headphones at that time. This lets you preview the mix output for that bus to ensure it’s right.
By default, the Monitor bus has the headphones engaged, and this is probably how you’ll leave it most of the time. This lets you have your own headphone mix separate from what your stream is hearing (usually in the Main mix).
You’ll also notice that when you select a mix other than the Monitor bus there’s a new Link button that shows up. This is a one-click sync to whatever your Monitor mix is. If you don’t need anything different from your Monitor mix going out over the stream, click this, and any changes you make on your Monitor mix get automatically made to whichever mixes you’ve engaged this button as well.
Rounding out the main output panel is the main fader for that mix, a mute button, and even a mono/stereo button. You probably won’t ever need to change this, so just leave it stereo.

Effects
Universal Control has five main effects–six, if you count the reverb strip–with which you can sculpt your tone: high-pass filter (HPF), a noise gate, compressor, equalizer, limiter, and a voice modulator. We’re going to refer to these as “plugins”, because in the audio engineering world, that’s what these really are.
The cool thing about these plugins is that they’re actually taken from PreSonus’s existing plugin offerings for their Studio One DAW, particularly from the Fat Channel XT channel strip plugins, which is where the Compressor and EQ plugins come from. As such, they’re pretty well-executed plugins, especially for “coming with a streaming mic”.

You can control this from the main screen, or click one of the settings icons to get into the advanced screen.

Within the advanced screen, not only do you have manual controls over the effects plugins, but you can even actually change up the plugin type in some cases. While the HPF, Gate, and Limiter are one-function tools, the Compressor, EQ, and Voice plugins all have extra “modes”.
The Compressor has these three modes:
- Standard: a typical modern compressor with a graphical UI and all normal control parameters. No coloring, straightforward compression with usually a solid-state sound.
- Tube: An analog tube-driven vintage compressor in the style of a Teletronix LA-2A. Great for overdriving and getting some fat warmth out of a mic, and offers both limiting and compression modes.
- FET: A solid-state FET (field effect transistor) compressor in the vein of Universal Audio’s classic 1176. You have more control than the Tube mode, with input, output, attack and release along with compression ratios a button-press away. This style compressor gives more bright and punchy tones as opposed to the warmer Tube model and more neutral Standard compressor.
The EQ also has three modes:
- Standard: A typical modern parametric EQ with multiple nodes for precise control over requencies allowing boosting or cutting of either wide groups of frequencies or surgical notching of a very specific frequency. A must-have in any toolbox.
- Passive: Modeled after the classic Pulteq EQP-1A two-band EQ. Boost or cut low and high frequencies. No fine control here, just general frequency selections but what you lose in control you gain in sparkle, presence and “air”.
- Vintage: While not an exact replica, this one is modeled after the Neve 1073. This EQ is between the Standard and Passive in control and specificity, but Neve-style EQs have stood the test of time, providing a very sought-after sound with punch and weight.
It should be noted that you can actually swap the position of the Compressor and EQ in the signal chain using the < > button that separates the two. Believe it or not, changing the order of these can absolutely alter your overall sound.
Last is the Voice plugin with five modes:
- Doubler: Essentially a stereo widener with the ability to emphasize low frequencies and a reverb you can’t turn off. Would be nice if the reverb can be disabled on this for pure stereo widening, but can sound okay when blending more toward the dry side.
- De-Tuner: Does what it says–detunes your voice.
- Vocoder: Roboticize your voice with selectable frequency and wave shape (sawtooth, rectangle, and noise).
- Ring Modulator: A basic synthesizer module with selectable frequency and distortion levels along with an optional sub carrier (lower tone) with its own frequency control.
- Filters: Yet more vocal filters allowing you to modify your voice. Tune adjusts the pitch of the signal, Damping controls how much high frequency signal gets through the feedback, Feedback controls how much echo is generated, and Distortion distorts the signal.
- Delay: Allows you to create various time-dilated effects, such as a slapback echo or repeated longer delays.
All of these plugins are pretty solid and they do a good job of holding up to the general vibes of their real-world predecessors. The controls are easy to work and all of these plugins are absolutely workable to get a very precise and expert result if you’re needing more than the general controls in the simple panel.
Presets
The plugins above are the building blocks to the presets we looked at before in the user interface. Those presets are:
- Broadcast Male
- Broadcast Female
- CB Radio
- Screamer
- Slap Echo
- Space Overloard
- AM Radio
- Android
These are mostly just example presets and are more of a novelty than a bespoke set of effects. But they sound pretty decent as a starting point, and you can absolutely use these as a starting point to build your own custom presets–which is something you absolutely should do.
We do like the Broadcast Male and Broadcast Female presets the most, of course, and using these as a springboard to fine-tune the settings for your own voice should be the first step. After this, by all means, build your weird and wacky sound effect presets. You do have 8 user presets available, so make use of them for sure!
To create the preset, use the settings here in the Fat Channel panel (or in the Advanced plugin control), then click the Save icon above the preset selector knob, name the preset, click an Empty box, then click Store.
Apple Silicon M1 and M2 Mac compatibility
All of the Revelator USB mics and audio interfaces are compatible with M1 Macs, and presumably any forthcoming Apple Silicon like the M2. We would advise checking PreSonus’ Apple Silicon support document for further details. It also outlines support for Universal Control, Studio One, and other PreSonus hardware as well.
Revelator audio quality
We recorded a bunch of audio tests in Reaper in a few different sessions and think there’s absolutely some quality potential here, but it does have its own character.
Dialog
Most people who buy this mic will be using it for spoken word dialog, as streamers are the target demographic. The Revelator USB Mic has a slightly darker tone than some others on the market.
In our tests, the Revelator has a less bright sound with a bit more full mid-lows and less top-end presence. It doesn’t necessarily sound dull or dead, but compared to a more bright Yeti X it’s definitely noticeable.
If you’re using the mic properly and are about 4″ away from the mic and are off-axis from the capsule it handles plosives (breaths and pops) reasonably well but can get overwhelmed when you’re right on-axis. That said, most mics in this price range have the same behavior.
The sound of “S’s”, or sibilance, isn’t terribly pronounced any more than we’d expect from this class of condenser mic, and as long as you’re off-axis you should be fine.
Engaging the Fat Channel with one of the Broadcast presets absolutely transforms the sound of this mic. It’s still the same core character, but, well, just better. With good EQ and compression, you can absolutely get some great lows without losing control while bringing back some of that mid-high/high sparkle and the air you may want.
While the mic doesn’t handle taps and bumps well (again, what mic in this price range does), it doesn’t have any incredibly annoying resonant frequencies. As long as you have it on a good mic arm (or even better, the Revelator SHK-2 shock mount) it shouldn’t be much of a worry.
Instruments
Wait, instruments? Yeah, we thought we’d have some fun and threw the Revelator on a small portable practice amp and recorded some quick clean and distorted guitar samples.
The results? Well, let’s just say that the previously mentioned darker tone doesn’t necessarily work too great on instruments, but since we did it, we might as well post them! For comparison, we’ve included the samples from the Yeti X as well.
It’s possible that it would sound much better on an acoustic guitar, especially a really bright-sounding one, but we’d definitely suggest sticking with recording voices with the Revelator.
The competition
There are a growing number of other USB condenser mics that have processing tools built in, and in the current streaming/work-from-home landscape, we’re only going to see more. Right now, there are definitely some strong running mates in this category, but these are the mics that we’re comparing the Revelator USB Mic against.
Blue Yeti X
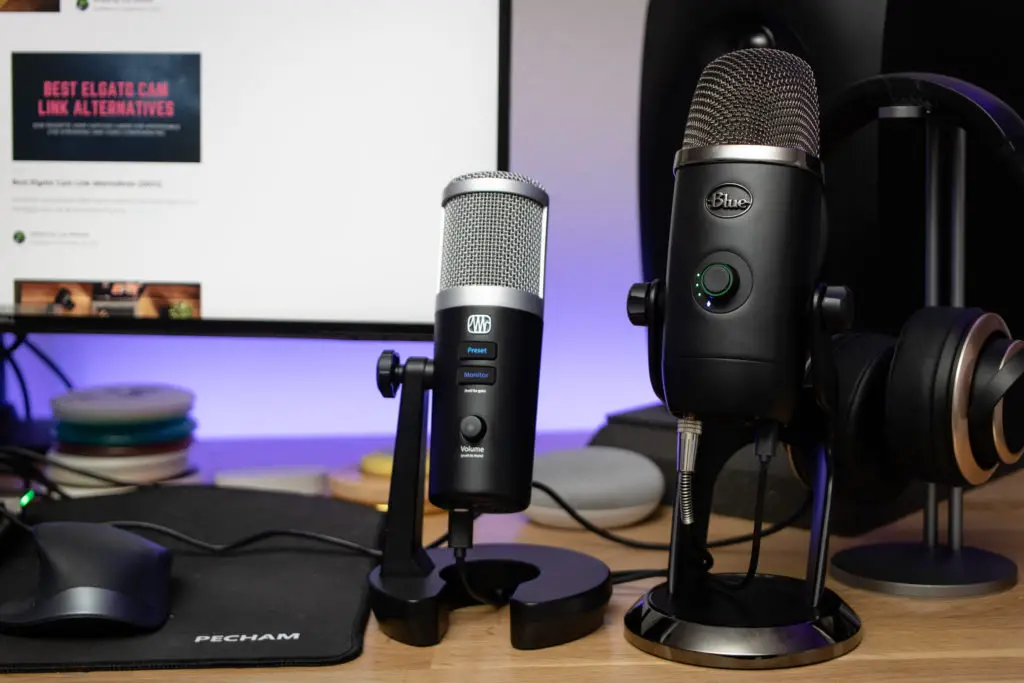
The big competition is the Blue Yeti X. The Yeti has long been a staple in YouTube and streaming setups, but have fallen out of favor to more specialized streaming mics in general–but it’s still a good-sounding mic.
The Yeti X brings some great post-processing tools with a solid software suite thanks to the Logitech G Hub. The included Blue Voice is an excellent processing toolset and can really work some wonders with little effort.
Elgato Wave:3
It’s no secret that Elgato has been wooing streamers heavily these days, and the Elgato Wave:3 continues that trend. It’s an excellent USB condenser mic with a capsule from Lewitt Audio and the excellent Wave Link software for a full routing solution. And obviously, there’s full integration with the Stream Deck line of products as well.
There are no built-in compressors, EQs, gates, or limiters, but there is a dual-gain function that will automatically lower the mic gain in the event of a heated gaming moment if enabled.
TC-Helicon GoXLR
We can’t omit the TC-Helicon GoXLR from this competition roundup, as it’s arguably the device that kind of kicked off this whole arms race anyway (as did its more affordable sibling, the GoXLR Mini). While the faders and cool RGB sure did turn plenty of heads, it’s the built-in processing that won the hearts of streamers.
The included software makes routing audio sources a breeze and the vocal processing presets and customization is a quick way to get your stream audio sounding great with minimal effort. Freeing streamers from fiddling with VST plugins in OBS is, in our opinion, what made the GoXLR such a long-standing default choice for many streamers.
Final thoughts
We’re really happy to see more manufacturers embrace the game streaming audience, and PreSonus has a pretty decent first offering with the Revelator. We hope to see that the software is continually improved, as this is where they’ll win over the users.
While it’s not the brightest-sounding mic, this may work to some peoples’ advantage. We think that it does a pretty good job and the software is easy to use, and just as importantly, is frequently updated.
We look forward to seeing PreSonus continue developing their streaming-focused offerings and commit to the strong software support they bring to the Studio One ecosystem.
PreSonus Revelator USB Mic
Summary
The Revelator is a solid USB condenser mic that new streamers will find easy to get started with. Its slightly darker tone works excellent for higher-register voices but is still quite useable on a wide range of voices thanks to the incredibly powerful Fat Channel plugins built into the Universal Control software.




![21 Best microphones for streaming and podcasting [2022]](https://www.creatorbeat.com/wp-content/uploads/2019/08/Creatorbeat-Best-Microphones-For-Live-Streaming-1200x628-Blog-265x139.png)


