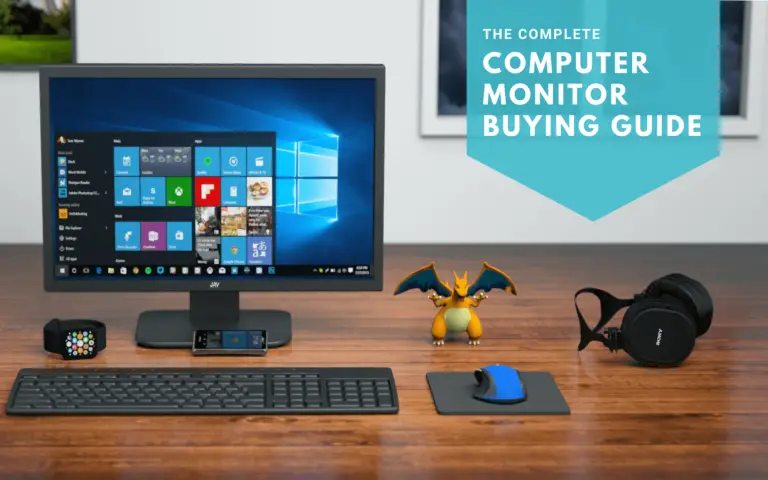
If you use a computer, chances are pretty good that you’re using a computer monitor of some sort (unless you’re reading this from a neural link computing future, of course). And you may have not given that monitor much thought, other than the size of the monitor.
For the casual user that’s absolutely fine! But for a more, ahem, discerning user, there may be more specific requirements and features that you need in order to help you do what you do. Picking the best computer monitor for your use can be difficult, but it doesn’t have to be a horrible experience.
There are so many monitors on the market these days with a ton of flashy buzzwords and (possibly) extraneous features. Picking the best computer monitor for video editing, gaming, photo editing, or other aspects of a content creator’s workflow can be quite overwhelming.
This is what we’re going to walk you through in this guide. We’re going to explain what these monitor features are, why you may/may not need certain features, and how to select the best computer monitor for your needs.

Contents
- 1 What are these computer monitor specifications and what do they mean?
- 1.1 Monitor size
- 1.2 Monitor resolution
- 1.3 Aspect ratio
- 1.4 Widescreen monitors vs ultrawide monitors
- 1.5 Computer monitor panel types (TN, VA and IPS panels)
- 1.6 Refresh rate
- 1.7 Variable refresh rate (G-SYNC and FreeSync)
- 1.8 Response time
- 1.9 Input lag
- 1.10 Brightness
- 1.11 Contrast
- 1.12 Viewing angles
- 1.13 HDR
- 1.14 Color accuracy and monitor calibration
- 1.15 Inputs and monitor I/O
- 1.16 Monitor articulation
- 1.17 VESA mounting
- 2 Computer monitor use cases – Monitors for specific tasks
- 3 Final thoughts
What are these computer monitor specifications and what do they mean?
When looking for the right computer monitor for certain uses, there are often specific features that you’ll need to pay attention to. Which features those are will vary depending on for what you plan on using the monitor.
Some of this may not be new to you, but for a lot of people looking for a the right computer monitor for them these specs and terms are likely completely unknown. Sometimes it can feel like an entirely different tech world.
If you want to skip past the intro to these features and specifications, feel free to do so. For the rest of you, however, let’s take a look at what you’ll need to know.
Monitor size
The first feature that most people look at when buying a computer monitor is the monitor size. The larger the monitor, the easier to see smaller text or details. These days, the average monitor size for general use is around 23″ or 24″ in a standard 16:9 widescreen aspect ratio.
Larger monitors around the 27″ size are much more affordable and common now, and often also pack 1440p or 4K displays. Larger monitors are definitely a great choice if you’re planning on running these higher resolution displays, as smaller text and operating system interfaces are easier to see on a larger display than a normal 24″ class display.
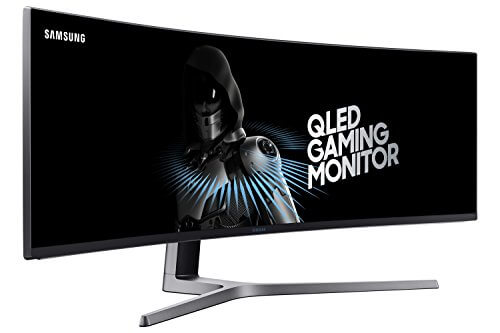
With ultrawide displays, you may see larger sizes such as 34″ or 37″ models. Samsung even makes a 49″ ultra ultrawide curved gaming monitor, and it’s quite the sight to behold. While they sound huge, vertically they’re usually the same as their 24″ or 27″ widescreen counterparts.
Monitor resolution
After monitor size, most people look at the monitor resolution. Resolution refers to the amount of individual pixels that make up the display. The standard resolution for most displays is 1920 pixels wide by 1080 pixels tall (written as 1920 x 1080). This is often shorthanded to 1080p, as referring to only the vertical dimension is easier and accurately conveys what you’re intending (the “p” refers to progressive scan, and isn’t really necessary to know as it’s not really relevant these days).
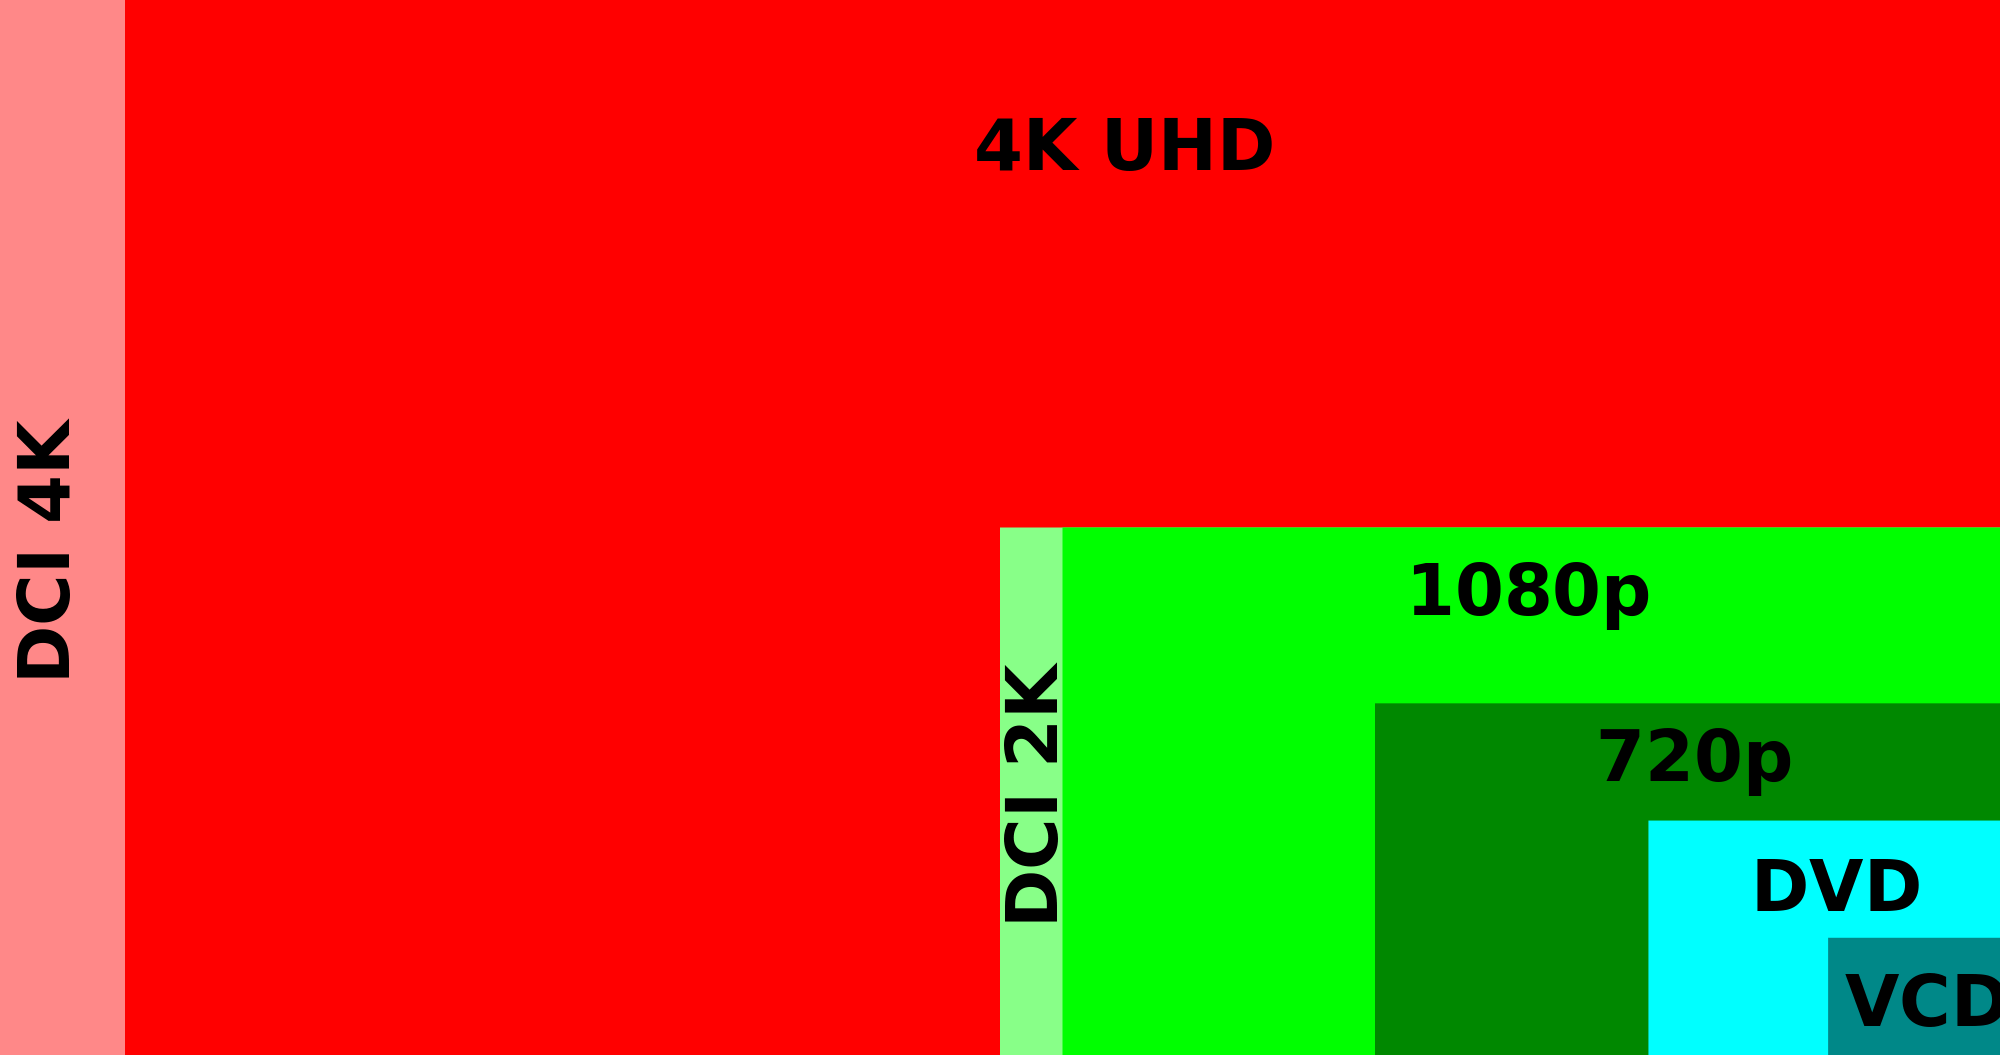
While 1080p is by far the most commonly found resolution and even recently was considered the pinnacle of mainstream display technology, it’s the baseline minimum you should ever buy. While technically 720p can be referred to as “HD”, it’s the low resolution TV version of HD. 1080p is referred to as “full HD”, and is the desired HD standard resolution. In other words, don’t go below 1080p.
With an increase in processor (or CPU) and graphics card (or GPU) power comes the capacity and desire to run higher resolutions. A very popular gaming resolution with current hardware is 2560×1440. This is the sweet spot between 1080p and 4K in terms of gaming performance, and gives more desktop space in Windows. 1440p is also sometimes listed as “quad HD”, as it is four times the resolution of a 720p “HD” display, or also described as WQHD (wide quad HD). Now we’re seeing how this stuff can get a bit confusing, right? Honestly, you can ignore everything but the actual number designations for the most part.
1440p is a popular resolution because it’s more than 1080p, but modern video cards can push modern video games at high frame rates. Higher resolution means better looking games, and higher frame rates means smoother looking games. Getting both of these is the best compromise we have currently until graphics cards can push 4K games the same way.
Speaking of 4K, let’s talk about that. 4K is a weird descriptor for the 3840×2160 resolution. It’s four times the total pixel count of a 1080p display, and actually indicates the horizontal pixel count, not the vertical count. While it could be described as 2160p, it’s rarely actually listed this way, as 4K is the marketing buzzword that caught on. It can also be listed as UHD (ultra HD), which you can see on a lot of display marketing along the 4K moniker.
4K is far more popular with TVs than computer monitors at this point, but it’s a growing choice with the increased power in modern CPUs and GPUs. While it’s not an optimal (or terribly affordable) gaming option, it’s increasingly used for video and photo editing as well as general and professional use. You get a lot more work space on a 4K display and true 4K media looks amazing.
Ultrawide monitors have extra horizontal resolution because they’re, well, ultra wide screens, as opposed to wide screens. The aspect ratio is usually listed as 21:9 whereas a widescreen is 16:9. This means instead of a 1920×1080 resolution, a 1080p ultrawide is 2560×1080, and a 1440p ultrawide is 3440×1440. But more on ultrawides and aspect ratios later.
There are other resolutions that some monitors do take advantage of. Dell has some 1920×1200 displays as a step between 1080p and 1440p displays, and some budget laptops have 1380×768 displays (stay away from these, by the way, they’re a pain to work in!).
Overall, as long as you’re at 1080p or above you’re good to go, unless you actually need the higher resolution for practical purposes. High resolution monitors do come with a price increase, so if you don’t need it don’t buy it.
Aspect ratio
We touched on this briefly above, but now we can get a bit more involved. Aspect ratio is basically describing the height and width proportions of the display in relation to each other.
Quick intro to how aspect ratios are described. Aspect ratio is usually written like “16:9”, where the first number is the number of equal horizontal parts to the number of equal vertical parts.
Let’s say a display had an aspect ratio of 1:1. It would be perfectly square, whereas 2:1 would be twice as wide as it is tall. It doesn’t describe the actual size, just the relation of width to height. Anyways, back to the actual ratio talk.
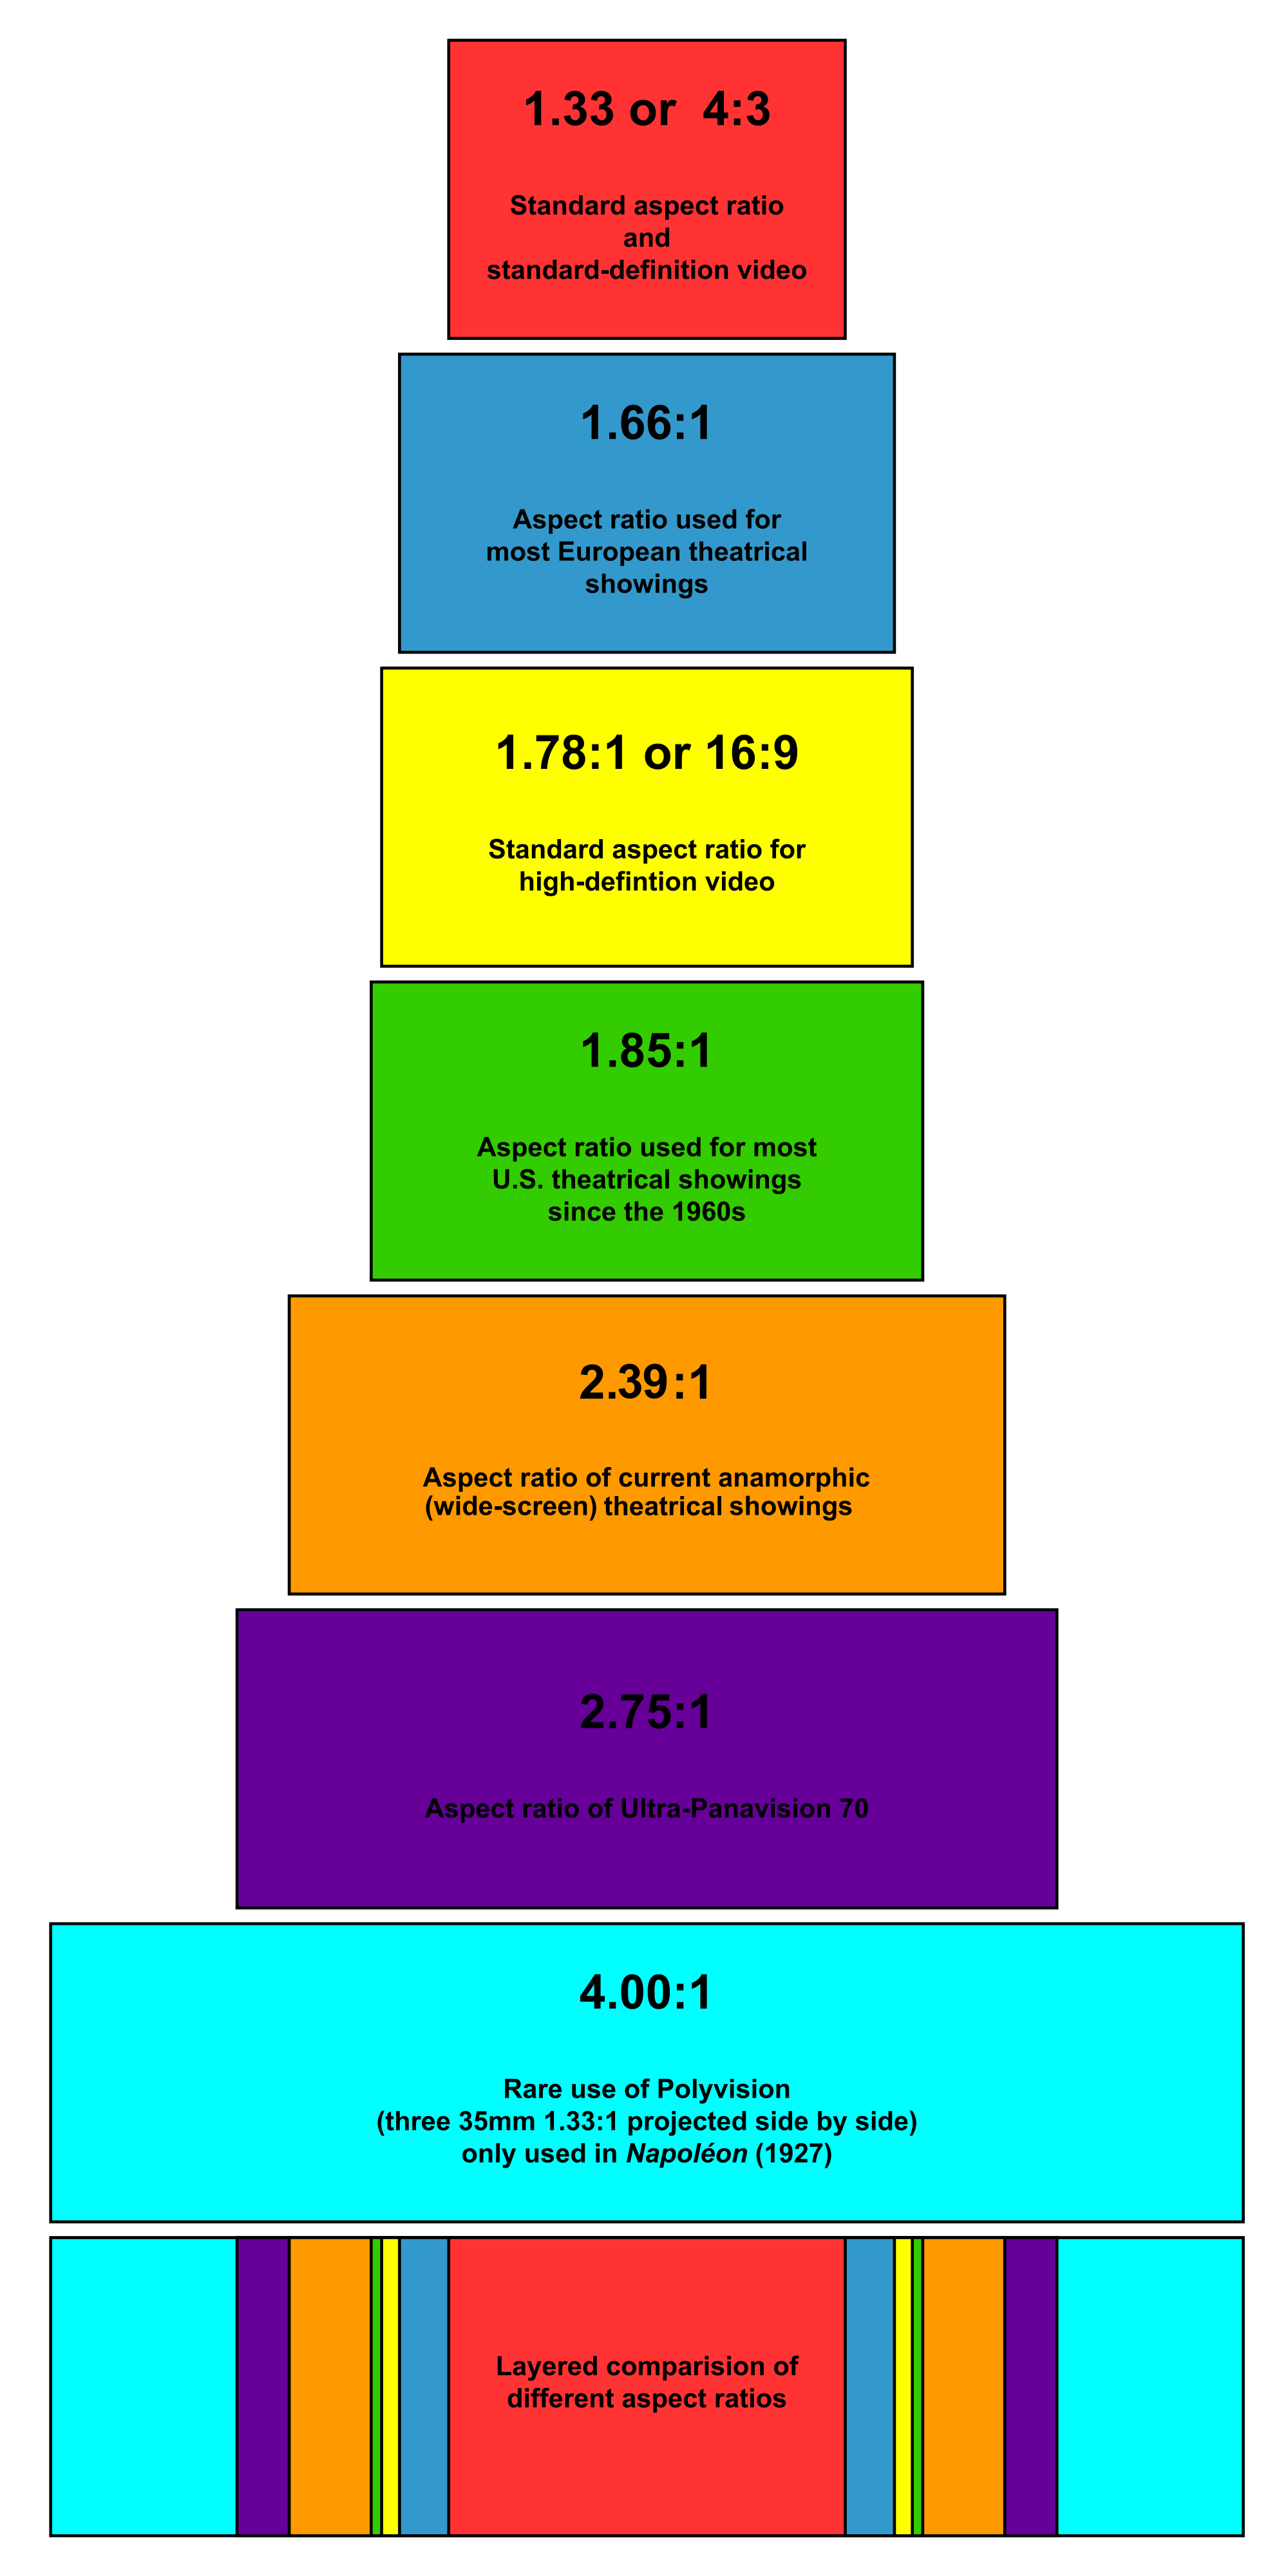
For example: old-school TVs and monitors like the big heavy CRT square displays were a four parts wide by three parts high, or 4:3 (or about 1.3:1). When you rented or bought a movie in “widescreen”, it was usually at 1.85:1 or 2.39:1, and resulted in huge black bars above and below the image (also called letterboxing) due to how they had to fit in a more square TV.
As more and more content became available in a widescreen format, 16:9 ratio became the widespread standard for HDTV, non-HD digital TV stations, and DVDs. This has been the case ever since, with the majority of monitors and TVs for decades now.
16:9 is more of a compromise between the previous standard of 4:3 and wider cinematic ratios. There’s still letterboxing with the wider 1.85:1 or 2.39:1 cinematic content (these are cinema/movie theater aspect ratios), but most content for home consumption is shot and/or formatted for 16:9.
As a side note, if you have a smartphone from the past few years you may have an extra tall 9:18 (or 18:9 when held sideways) display like on the Samsung Galaxy S8/S9 and many others. As a result, a growing number of YouTubers like Jonathan Morrison, Linus Tech Tips, and MKBHD are shooting in this 18:9 (or 2:1) ratio.
Back on track, however. Pretty much every screen you look at these days (other than your phone) is 16:9, without a doubt. But with the advent of ultrawide displays we are seeing 21:9 as a very common computer monitor aspect ratio. 21:9 isn’t technically mathematically accurate, but it’s close enough to give a reasonable analogous value to 16:9.
What this extra sideways ratio gets you is more pixels and more workspace. We’ll cover that more shortly.
Widescreen monitors vs ultrawide monitors
As we mentioned, widescreen monitors are the usual 16:9 aspect ratio displays, just like your modern HDTV, laptop, and desktop monitors.
Over the past several years, ultrawide monitors with a 21:9 aspect ratio have become more and more popular. The reason for the popularity of ultrawide monitors is because they give you more workspace than a traditional 16:9 widescreen monitor.
As dual (or more) monitor setups have become much more commonplace at home and at work, a single ultrawide that can take the place of two widescreen displays have seen a rise in popularity as an alternative. This is often seen as a more elegant and streamlined way of expanding your desktop, with a few benefits.
The best part of a single ultrawide setup is that you don’t have a physical boundary between your two monitors. For some people, even slim bezels (the borders around the panel itself) separating the desktop images can be distracting. You can put two applications up side by side without really losing much viewable space on each.
You could have a web browser on one side, and Netflix on the other, Excel and Word up simultaneously, or many other combinations. It’s also helpful for video editing, allowing you to stretch your timeline much wider than on a widescreen display.
There’s also a benefit for gaming. You can’t necessarily game on a dual monitor setup and use both monitors without those bezels getting in the way. For shooters this is even worse, as your crosshair would be split directly down the middle by the bezels. This would basically make the game unplayable.
An ultrawide eliminates this physical barrier, however, some people still enjoy having physical spaces for app windows. It’s easy enough to move an app from one screen to another with the Windows and shift keys along with the left or right arrow key. It will neatly move the whole window, whether maximized or not, whereas with an ultrawide you can only snap to left or right with Win+arrow keys, or manually position the app.
There’s another physical trait that accompanies most ultrawide monitors, and that’s the fact that the majority of the ultrawide monitors on the market is that they’re actually curved displays, not flat and straight like any other monitor or TV you may see.
The left and right edges are further away from your eyes by quite a bit more than a standard 16:9 display. Curving the monitor brings those edges closer, and therefore makes it easier to see.
Curved monitors also create a bit more immersion, as they literally wrap around the viewer. With such a wide display, a user will end up turning their head more to look at the far edges of the display and the curve helps make this feel more natural, and take up a bit more of your viewing angles.
There are a few ultrawide monitors that are not curved, but have fallen out of favor by most people due to the allure of these curved displays. There are also curved standard 16:9 displays, but this is usually a bit of a gimmick and the curve doesn’t translate well to these displays.
The choice between standard widescreen monitors and newer ultrawide monitors is entirely a personal one. If you feel that your 16:9 displays are getting the job done (especially with a 1440p or 4K monitor), stick with it. If you want to spread out and get some more room (or consolidate a dual monitor setup), check one out. You can’t go wrong either way.
Computer monitor panel types (TN, VA and IPS panels)
We’ve come a long way from the days of big, bulky, heavy CRT monitors and live in the age of sleek, svelte, and sexy flat panel displays. No longer do our desks buckle under the weight of one somewhat large display, for which our desks are infinitely grateful, no doubt.
With the introduction of flat displays, we saw a few types of monitors and TVs. Most of these are either LCD (liquid crystal display), with some in the past being plasma displays. Plasma displays were more popular in TVs back in the early 2000s, and have since been supplanted by LCDs in various forms.
So what is the monitor panel? The panel is the part of the monitor that actually displays the content. It’s the thin assembly of pixels and backlight that lights up so we can see what our computer is doing. It’s the actual display component of the display.
LCDs panels then were augmented with LED backlights, being known cleverly as LED LCD displays, or just LED displays. And within these LCDs are different types of the panel technology.
TN panels
TN (Twisted Nematic) panels are the most inexpensive and least accurate displays. Most monitors you’ve ever looked at probably have a TN panel. They’re extremely fast at redrawing, but they have the most amount of color-based weaknesses, with poor viewing angles and color depth, as they can only reproduce 6-bit colors, dithering up to a fake pseudo 8-bit depth.
If you don’t care about color accuracy, just need something for browsing online or playing some games and want to spend not much at all, a TN panel is passable. Perhaps even better (for the cost) if you’re playing twitch-response games at high refresh rates.
VA panels
Next we have VA panels. VA (Vertical Alignment) displays are the next step up from TN panels. They have true 8-bit color reproduction, wider viewing angles, and higher accuracy than TN panels.
The refresh and response rates are slower than TN and IPS panels, and even will introduce more input lag. If you’re playing fast paced games, these won’t be the best option for you.
You will get a higher contrast ratio with a VA panel, so watching content can definitely look great. That is, so long as you don’t sit off-angle. Color shifting on VA panels is particularly bad, and you’ll see uneven color and brightness on the display as you move left to right, or even up and down off of the center viewing axis.
If you’re watching a bunch of videos or playing slower games directly in front of the display, perhaps a VA panel can get the job done for you. But there are definitely a large number of concessions you’ll make by picking a VA panel
IPS panels
Finally we have IPS (In-Plane Switching) panels. IPS panels are easily the highest quality LCD panels available in terms of how good the display looks. IPS panels have the highest color accuracy making them excellent for photo and video editing, graphic design, and any other color-sensitive tasks.
They also have the widest viewing angles of all the panel types, up to 178 degrees of sweet spot. You will notice that the blacks shift a bit with a slight purple hue when at the edge of that range, but you do have to really push that angle game to see the shifts.
Unfortunately, IPS panels do have slower response and refresh times, making them less of an ideal choice for fast-paced gaming, but IPS panels are constantly getting faster, and some are definitely viable for gaming if you put enough money out for one. VA panels are still slower on average, so an IPS monitor is better for gaming.
As IPS panels get faster, they get more adoption on laptops as well. Instead of only being found on devices meant to be video editing laptops, they’re now increasingly showing up on gaming laptops or hybrid gaming/content creation laptops now that they’re finally getting fast refresh rates.
You may see that there are different versions of IPS, such as H-IPS, e-IPS, S-IPS, and P-IPS. This doesn’t really matter that much, other than the fact that most e-IPS panels can only display a 6-bit color depth, so avoid these if you’re doing color-critical work.
You’ll also find proprietary versions of IPS displays, such as Super PLS from Samsung, and AHVA from AU Optronics (a popular panel manufacturer that sources panels to desktop monitor and laptop manufacturers). Despite similarity to the VA panel moniker, it’s really an IPS-style panel technology.
OLED panels
We’re now starting to see OLED panels in TVs, and wow, do they look great. OLED is also what you see on a lot of high end flagship smartphones, such as the Galaxy S8/S9/S10, iPhone XS/XS Max, and many more.
OLEDs can actually turn individual pixels off, creating true blacks, as there is no backlight being pushed through a “black” pixel. This delivers extremely “inky” blacks and great contrast ratios, and can get pretty bright.
Unfortunately, OLED panels are still pretty expensive, and haven’t really made it into any computer monitors, with the exception of the Dell UP3017Q, which has since been discontinued. Asus also has plans to release the ProArt PQ22UC, a 21.6″ 4K UHD HDR OLED monitor (wow, the acronyms!).
OLED panels also suffer from screen burn-in. This is what occurs when the same graphic elements stay on screen long enough to so that it imprints, or “burns in” that element due to the pixels being on for so long without changing.
Currently we don’t really have good, viable OLED tech for computer monitors. IPS is the best we have until OLEDs get figured out, so don’t burn your time trying to find one at this point.
That said, during CES 2019 we’ve seen some OLED monitors being demo’d and announced (such as this massive Alienware monitor), so perhaps these issues have been worked out (or will be soon, perhaps).
So what display panel type should you get? Basically, it breaks down to this:
- If you need color accuracy, get an IPS panel.
- If you need super speed for gaming and/or don’t need color accuracy or anything fancy at all, get a TN panel.
- VA panels are pretty much lost between the two, and aren’t necessarily great at either gaming nor graphic design.
- OLED panels aren’t a viable option yet, so skip it for now, but keep an eye out in the years to come.
Refresh rate
Refresh rate is frequently one of the more marketed specs or features of modern computer monitors, as high refresh rate monitors are more popular than ever. This popularity is due to the explosion in the gaming market combined with more powerful GPUs capable of driving high frame rates along with a huge decrease in the price of high refresh rate panels.
Refresh rate is measured in hertz (Hz), which is a measurement of cycles per second. This is the same hertz as in megahertz (MHz) or gigahertz (GHz), which are millions or billions of cycles per second.
But what exactly is refresh rate and how does it tie in to gaming performance? Simply put, refresh rate is how quickly the panel as a whole can redraw a new image to the screen. Think of it as a frames per second measurement of what the panel hardware is physically capable of drawing.
The majority of computer monitors and laptop displays you’ve encountered are all 60Hz displays. This has been a standard refresh rate in North America for quite a long time. This means that the monitor can redraw an image 60 times per second. If you’re watching a 24fps movie or YouTube video, this means that for each frame of the video, the monitor will redraw the same frame between 2 and 3 times before the video moves to the next frame. 30fps video will have each frame drawn twice before the next frame is drawn.
Way back in the day before current displays and GPUs were as powerful as they are now, the ideal FPS for games was 30fps or higher. Nowdays with current generation game consoles and PC gaming, the target is 60fps as a minimum for smooth, lag and jitter-free gameplay. Esports titles can easily double or triple those frame rates as well.
But there’s a problem when you start exceeding 60fps on a 60hz display. If you’re playing Rocket League at 120fps, your screen can only update itself fast enough to catch half of the frames the game draws. This can produce tiny gaps in the animations. You’re rarely going to notice this if you aren’t looking for it, but for fast paced esports titles like CS:GO and Call of Duty it means you’re going to miss crucial details in the gameplay.
If your game’s frames per second aren’t an even multiple of 60hz, the panel isn’t able to redraw whole frames before the frame switches. This means you get each refresh of the panel as a blend of two (or more) frames of the game.
This results in “tearing”, where the image looks like it’s literally being torn during motion. Vertical sync is a helpful in-game option to help limit the game to 60fps, but can create stutter and lag if your machine can’t push 60fps constantly. You also rob yourself of performance if your game is pushing more than 60fps, losing potential smoothness in gameplay.
Enter high refresh rate monitors, usually in the 144Hz area. You’ll also see 120Hz (like my current laptop) or 240hz, along with some other variants, but the sweet spot and popular spec target is 144Hz. If your game can push higher frame rates, your monitor can refresh more closely aligned to those rates, and produce less torn and jittery video.
For first-person shooters and other fast paced games, this means you see your opponents’ movements more accurately, resulting in better chances to be shooting where your opponent actually is according to the server, and not receiving outdated information because of a slow refresh rate.
It’s not only gamers who get the benefits, however. Higher refresh rate also helps smooth things out in general computer use as well. On a high refresh rate display, everything from mouse movements to scrolling through web pages to watching high frame rate YouTube videos and Twitch game streaming can be improved (provided they record/stream in over 60fps, of course). The higher refresh rate contributes to a better looking image during these tasks.
High frame rate monitors mean that your daily computer use feels nicer, is easier on the eyes, and just generally looks better. Gaming is faster, more accurate, and fun. If you’re not much of a gamer and you don’t notice the visual difference, you won’t get much out of it. But for a lot of people, a 144Hz high frame rate display is definitely better than the traditional standard of 60fps.
Variable refresh rate (G-SYNC and FreeSync)
As mentioned above, having GPU output at frame rates that can’t match up with the monitor’s refresh rate can create visual flaws, such as tearing and other issues. What if there was a way of getting the monitor to adapt to what the GPU is outputting?
Enter variable refresh rate, or VRR. Basically, the GPU outputs a certain frame rate, communicates this to the monitor, and the monitor syncs up its refresh rate down to the GPU’s frames per second. This reduces the skipped or blended frames, and ensures a one-to-one matching of frame rate and refresh rate.
This can contribute to insanely smooth gameplay at higher frame rates, and will smooth out a lot of tearing and jitter. Unfortunately, it does contribute a small amount to input lag, but usually it’s marginal.
Both AMD and Nvidia offer their own versions of VRR. AMD’s version is called FreeSync, and is the more available of the two. AMD doesn’t charge a licensing fee to use the technology, so monitor manufacturers can add the feature without extra cost on top of the new hardware itself.
On Team Green’s side, Nvidia offers G-SYNC. Unfortunately, there is a hefty licensing fee for manufacturers to add the G-SYNC module to their displays, so G-SYNC-enabled monitors can often cost up to $100-200 more than FreeSync-equipped or non-VRR monitors.
With the majority of gamers running Nvidia GPUs, this is definitely a bit of a letdown, and honestly isn’t worth the extra cost at this time for almost all users.
While writing this article, however, something big has changed. Previously, we ended that paragraph with “The likelihood of this changing any time soon is pretty minimal, seeing as Nvidia knows they have a stranglehold on the high end gaming market.” Turns out we should have waited a bit.
During their announcements at 2019 CES, Nvidia announced that with a future driver update, non-G-Sync monitors can work with Nvidia GPUs. Yes, this means the lower cost FreeSync monitors that don’t have the G-Sync module.
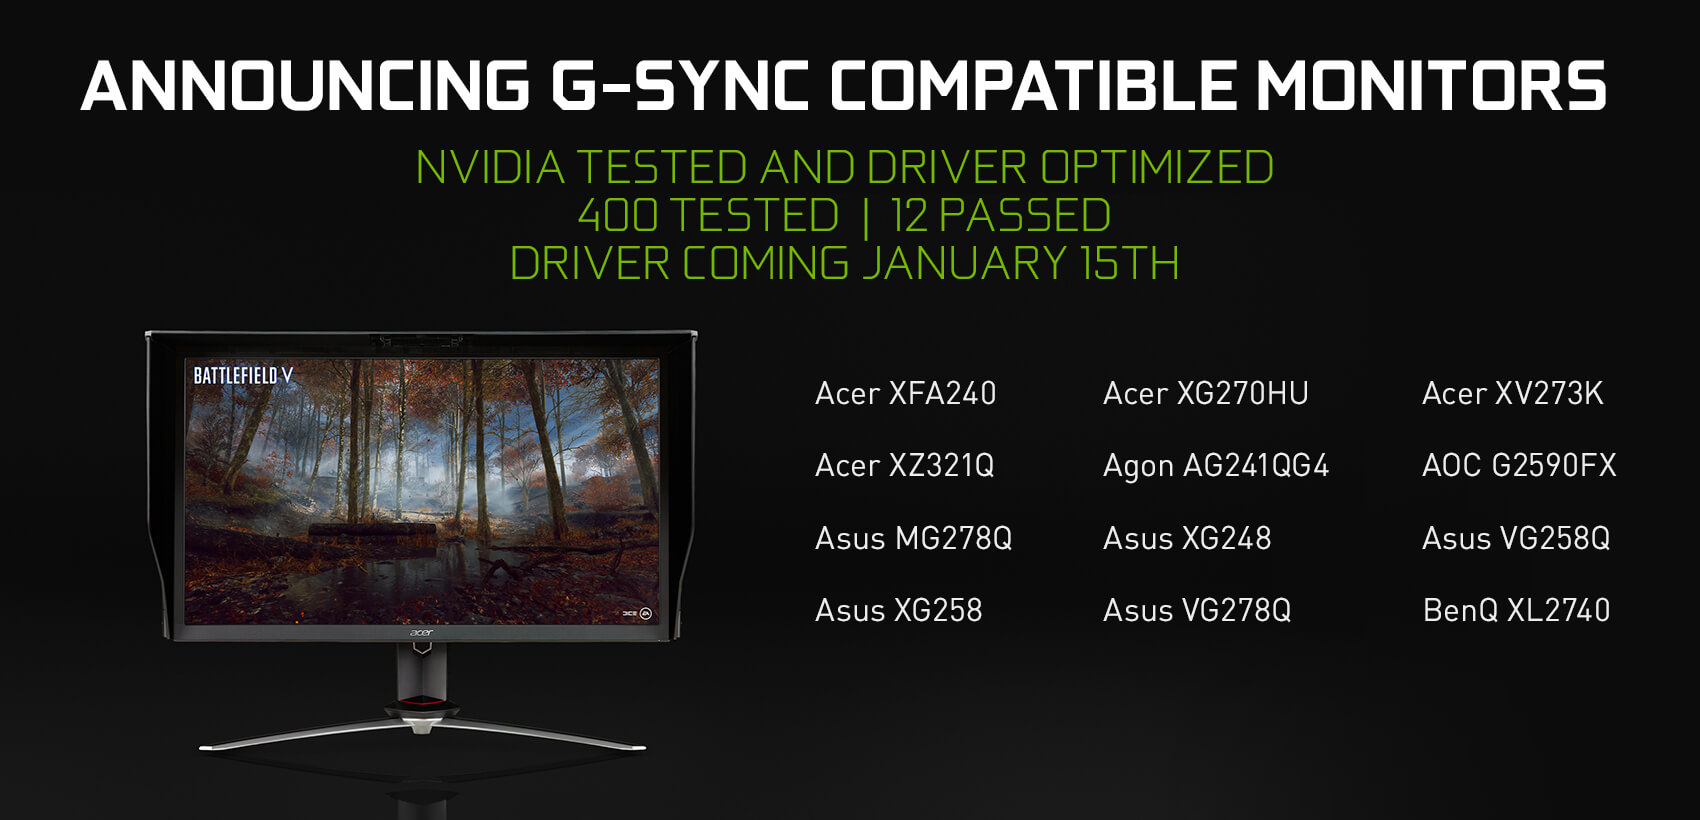
Nvidia has so far tested about 400 VRR monitors, and has validated 12 as “G-Sync Compatible” as of writing this. These monitors will automatically engage VRR without manual intervention. Non-validated monitors will still technically work, however will require manual enabling of G-Sync.
Non-validated monitors, at this point, do experience some issues, such as visible ghosting of the image, or even worse, blanking of the entire image for a fraction of a second. This may improve as time goes on, but at least as of this moment, it’s definitely not a guaranteed thing by any means.
While FreeSync is free, we’d venture an opinion at this point that until the next generation of AMD Navi GPUs come out, it’s not worth buying current AMD Polaris-based GPUs just to use VRR (and yes, the newly announced Radeon 7 is still Polaris, sadly). Now that FreeSync monitors can possibly work well with GeForce GPUs, it does open up a good amount of options for GeForce owners; it’s good news all around.
Response time
While it sounds very similar to refresh rate, monitor response time is a bit different. Whereas refresh rate is the speed at which the whole panel redraws the image, response time is the speed at which the actual pixels can change from fully on or lit up (white) to completely off (black).
The main difference here is that we’re looking at how fast those pixels can react to the changes demanded by the panel. When a panel redraws the image, it triggers each pixel to either stay the same, or change to a new color and brightness value. The faster this is, the more crisp the images become.
The main issue that occurs with a less than desirable response time is “ghosting”. Ghosting is exactly what it sounds like: When a character moves on screen, for example, a slower response rate will result in the pixels not changing fast enough, creating an overlaid duplicate copy lagging behind. This is essentially creating a “ghost” of the character, making it blurry and, well, ghost-like.
This is a big issue when playing fast-paced games like first person shooters or racing games. Opponents down field may appear slightly larger than their hitboxes actually are, causing missed shots. Race course elements may not look accurately detailed when screaming down the track.
Overall, while this clearly has a bit of a gameplay effect on first person shooters and other quick reaction games, in general the main detractor is that it just looks bad. If your GPU is driving high frame rates into a high refresh rate monitor and the response time is not great, the ghosting is going to be magnified and create a pretty poor gaming experience.
A good desirable response time would be one millisecond gray to gray response time. This is the target goal for a “gaming monitor”. Gray to gray refers to going from a gray color to fully off, and then back to gray.
Gray is used as the starting/ending state because it’s actually a more complex color state for pixels because it’s firing all three colors of the pixel at medium brightness with the backlight at full intensity.
You will see some monitors state that they have 1ms or 2ms response times, but may measure white to white, or some other weird way of getting a 1ms response time in a way that actually doesn’t check out to be as fast as a 1ms gray to gray measurement.
Response time may be getting a bit too far into the weeds as far as monitor specs, but for gamers (and maybe even video editors/color graders) you’ll want the fastest gray to gray response time possible.
For everyone else, a low response time is desirable, but you can get away with 3-5ms. Anything slower than 6ms isn’t the best for gaming, and less than 10ms will just look soft and difficult on the eyes.
Input lag
So, we’ve looked at how often the screen redraws with refresh rate, and how fast each of those pixels can change with response time, but what about how quickly the monitor can react to an instruction to perform that change?
For that, we need to look at input lag. Another complicated specification for monitors, and one that doesn’t necessarily impact the majority of users, much like color accuracy, input lag is how long it takes for the display panel to change after the computer says to make the change.
If you don’t do any serious level of gaming, you probably don’t care about this spec. You may notice egregiously slow input lag on very low end panels, but you may not need anything more than bare minimum acceptable lag times.
So what are the ideal ranges of input lag times?
- The best monitors have an input lag time of less than 7ms (or 1 frame lag at 144hz refresh rate). If you’re a pro gamer, you’ll be aiming for this level of performance.
- From about 7 to about 14ms, you’re looking at between one and two frames at 144hz, and will be fine for casual gaming, but fast paced gamers may suffer.
- Anything over 14ms isn’t suitable for high end gaming, but still acceptable to casual gaming up to probably about 20ms.
- Anything over 20ms and you’ll start to notice visible lag other visual problems when gaming, and most likely even in general desktop use.
The short version here is that, in general, the less input lag you have, the better the monitor will react to what your GPU is telling it to do. You may not need to get the fastest possible lag times, but you’ll want something within a reasonable range, preferably below 15ms even for general use.
Brightness
Most people are pretty familiar with adjusting their monitor’s brightness and contrast, and there’s not really much to them. In addition to making sure the image looks balanced, it also helps with the ability for the panel to create a bright and vivid image in multiple environments.
Ideally, your monitor should be able to increase up to around 300 to 350 cd/m2, or “candelas per square meter”. This is also referred to as “nits”. Basically, it’s a measurement of brightness, so you’ll ideally want to find something over 300 nits if you value a bright display, especially for use in a room with lots of natural light.
Some displays may be measured in lumens, however this is usually reserved more for projectors. The two are vastly different scales of measurement though. One nit is about 3.426 ANSI lumens, so keep that in mind if something measures in lumens and not nits.
Contrast
Computer monitor contrast ratios describe the difference between the panel’s full white “whiteness” and the monitor’s full black “blackness”.
The higher the contrast ratio, the more individual levels there are that exist between full white and full black. This means that a high contrast monitor can display more “dynamic range” in an image. This means more details in dark shadows and bright highlights.
Most monitors claim to have a ratio of 1000:1, and a majority of newer IPS/AHVA/PLS monitors can range up to 1500:1, yet another indicator of IPS panels looking better than their TN or VA counterparts.
The problem with contrast ratios is that there are no standardized measurement systems for measuring contrast, so one manufacturer’s specs can’t specifically be identical to another’s. But typically, just like brightness, you’ll want to find something with a fairly high contrast ratio–just don’t always trust the manufacturer’s numbers to always be what you may expect.
Viewing angles
All flat panel displays look the best when you’re viewing the display directly in front looking square at the display. As you move side to side or up and down from that center position, you’ll notice the panel shift in brightness, contrast, and color accuracy.
The maximum amount you can move from that center before the image looks less than ideal is what is referred to as viewing angles. IPS panels typically have the best viewing angles, as mentioned previously, up to around 178 degrees of off-axis viewing.
Some TN and VA panels will have better than average angles, but IPS definitely rules the roost in this area. But how big of a deal is this feature to most users?
To be honest, not nearly as much as most of these other features we’re looking at. Most people are the only person using the computer at a time, and don’t frequently have other users crowding around your display.
If you’re a creative working in fields like photography, video editing, graphic design, or even running a recording studio you may have people huddling around your monitor looking at your work and increased viewing angles can definitely help here.
More importantly, if you’re working with color-sensitive content creation, you’ll want to ensure that you have the largest “sweet spot” for viewing as possible. You don’t want to make a color choice, move your chair a bit, slouch or sit up, and notice a color shift.
Again, as with brightness and contrast (and most other features here), you’ll want the widest viewing angles possible, but it’s probably not going to be a deal breaker for most people if it’s a bit less than the absolute best.
HDR
High dynamic range, or HDR, is a growing feature in HDTVs and computer monitors. While HDR TVs are more and more popular and popular with consumers, it’s lagging behind in adoption in the PC space.
Basically, HDR is a way of displaying an image that has a wider range of color and brightness information than your usual display is capable of. HDR content contains more levels of brightness than SDR content.
Part of the way HDR works is by reproducing brighter highlights and darker shadows, and having just one global backlight can’t do this, so HDR displays utilize what are called lighting zones.
Each zone in a panel can be lit independently. The more zones you have, the more finite control over the backlighting the monitor can have. Think of it as resolution for the backlight–the higher, the better.
This means that one particular frame can have some zones dimmed to create deep inky dark shadows and still have very bright highlights in a sky or other light source with those lighting zones cranked to full brightness.
Because HDR capable monitors need to have a much higher overall brightness level, your normal brightness goal of 300-350 nits doesn’t cut it. The ideal baseline would be a 1000 nit brightness rating.
Not all HDR monitors can get up to the ideal target brightness of 1000 nits, however. There hasn’t been much in the way of standards to ensure that “HDR-capable” displays are actually decent HDR monitors.
VESA did just recently release the DisplayHDR standard with three certification levels: DisplayHDR 400, 600, and 1000. There are other HDR standards that you’ll see in TVs, such as HDR 10, HDR 10+, and Dolby Vision. Unfortunately, with PC monitors, only HDR 10 was supported until DisplayHDR was announced.
So all that said, what does HDR actually do? Here’s a good analogy for you. Think of when you’re taking a photo of someone indoors, and there’s a window behind them. Your eyes can see both the person and the scene outside your window just fine.
However, when you take this photo, either the person is the right exposure and brightness and the window is blown out (over exposed), or the window is exposed properly and the person is way under exposed and looks like a silhouette.
This is because your eyes have a drastically larger dynamic range than cameras do. Computational photography assistance (the software in modern smartphones that seem to work magic, such as the Google Pixel Night Sight mode) and HDR modes aside, cameras (and therefore recorded content) can’t capture the same range of brightness that our eyeballs can.
Thankfully, camera technology is at a point now where HDR video capabilities are not only in pro-level cameras, but also making its way into consumer models, such as the Panasonic GH5.
Because of this, HDR content is popping up more and more places, many series’ on Netflix are HDR, along with other streaming content and Bluray discs. PC game developers are also introducing HDR support into major AAA titles, but as with many other display technology, PC-based HDR is definitely far behind the adoption rate of consumer televisions.
Long story short here, do you need HDR support on your computer monitor? No, probably not. Will that be the case for a long while? Again, probably not. Can it help make your games and HDR videos look better? Yes.
If you’re really into cool looking visuals, go for it. If you’re going to be creating HDR content, you’ll definitely need at least one HDR display. The hardware is getting better, and thankfully so is Windows and game support.
Color accuracy and monitor calibration
This is possibly one of the more complicated areas of monitors to get in to, and we’ll only touch on it briefly for that reason. But in general, people want their monitor to be able to display the correct colors of what they’re looking at. The more accurate a monitor’s colors, the better the experience.
Color spaces
A color space is a method of defining a standard of a set of colors. This color space will say a specific shade of a color is actually that specific shade, and ensures that the software instruction to display that color is interpreted accurately by the software that does the display and the hardware that outputs that display decision.
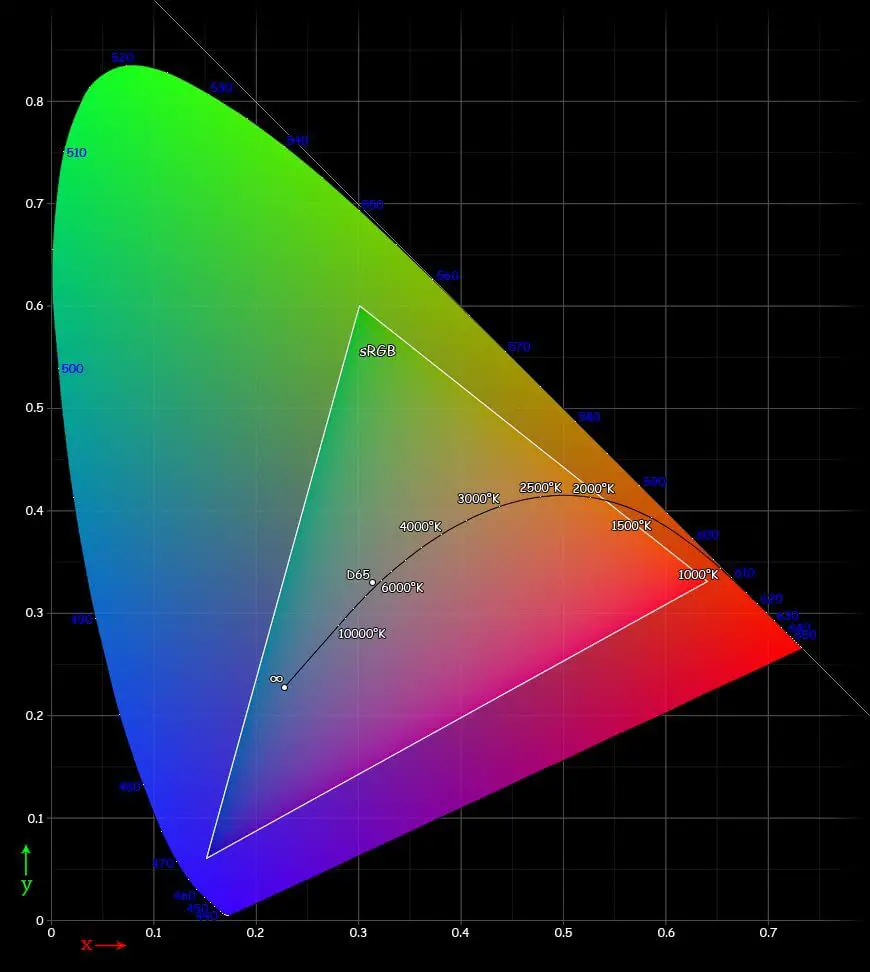
Monitors, depending on the panel quality, are capable of displaying some percentage of that color space. The more of that percentage it can display the more accurate the monitor. A monitor’s specs will list things like “93% sRGB, 70% Adobe RGB”, indicating how much of those colors it can accurately reproduce.
The sRGB color space is the de facto standard of almost all computer systems and software, as well as the web and web browsers. Most people will want to stick with this color space as it’s the most difficult to catastrophically get wrong.
Adobe RGB has a wider gamut of colors, meaning there’s more space between each specific shade than sRGB. This is typically used with high quality CMYK printing, and isn’t often used by most people.
If you use Adobe RGB and deliver for the web and other consumer devices, you’ll need to convert your Adobe RGB files back to sRGB, so it’s a bit of a hassle unless you really know what you’re doing.
Professional creation displays will also have Rec 709 and DCI-P3. Rec 2020 is on the horizon, but not terribly common yet. These are color spaces used in broadcast television and cinema, and aren’t necessarily used unless you’re working in these industries.
Color calibration
Color spaces may define the set of colors, but they don’t guarantee that, for example, red equals red. For that, you need to calibrate the monitor in some way.
The most common measurement of calibration accuracy would be the Delta E value. This is found on color calibration results, and is an indicator of how accurate the monitor is within those color spaces. The ideal measurement would be a Delta E of 2 or less.
Some monitors do ship with “factory calibration”, meaning the manufacturer performed a calibration process on the monitor to ensure that the specific panel on your monitor on your desk is calibrated to show the correct colors.
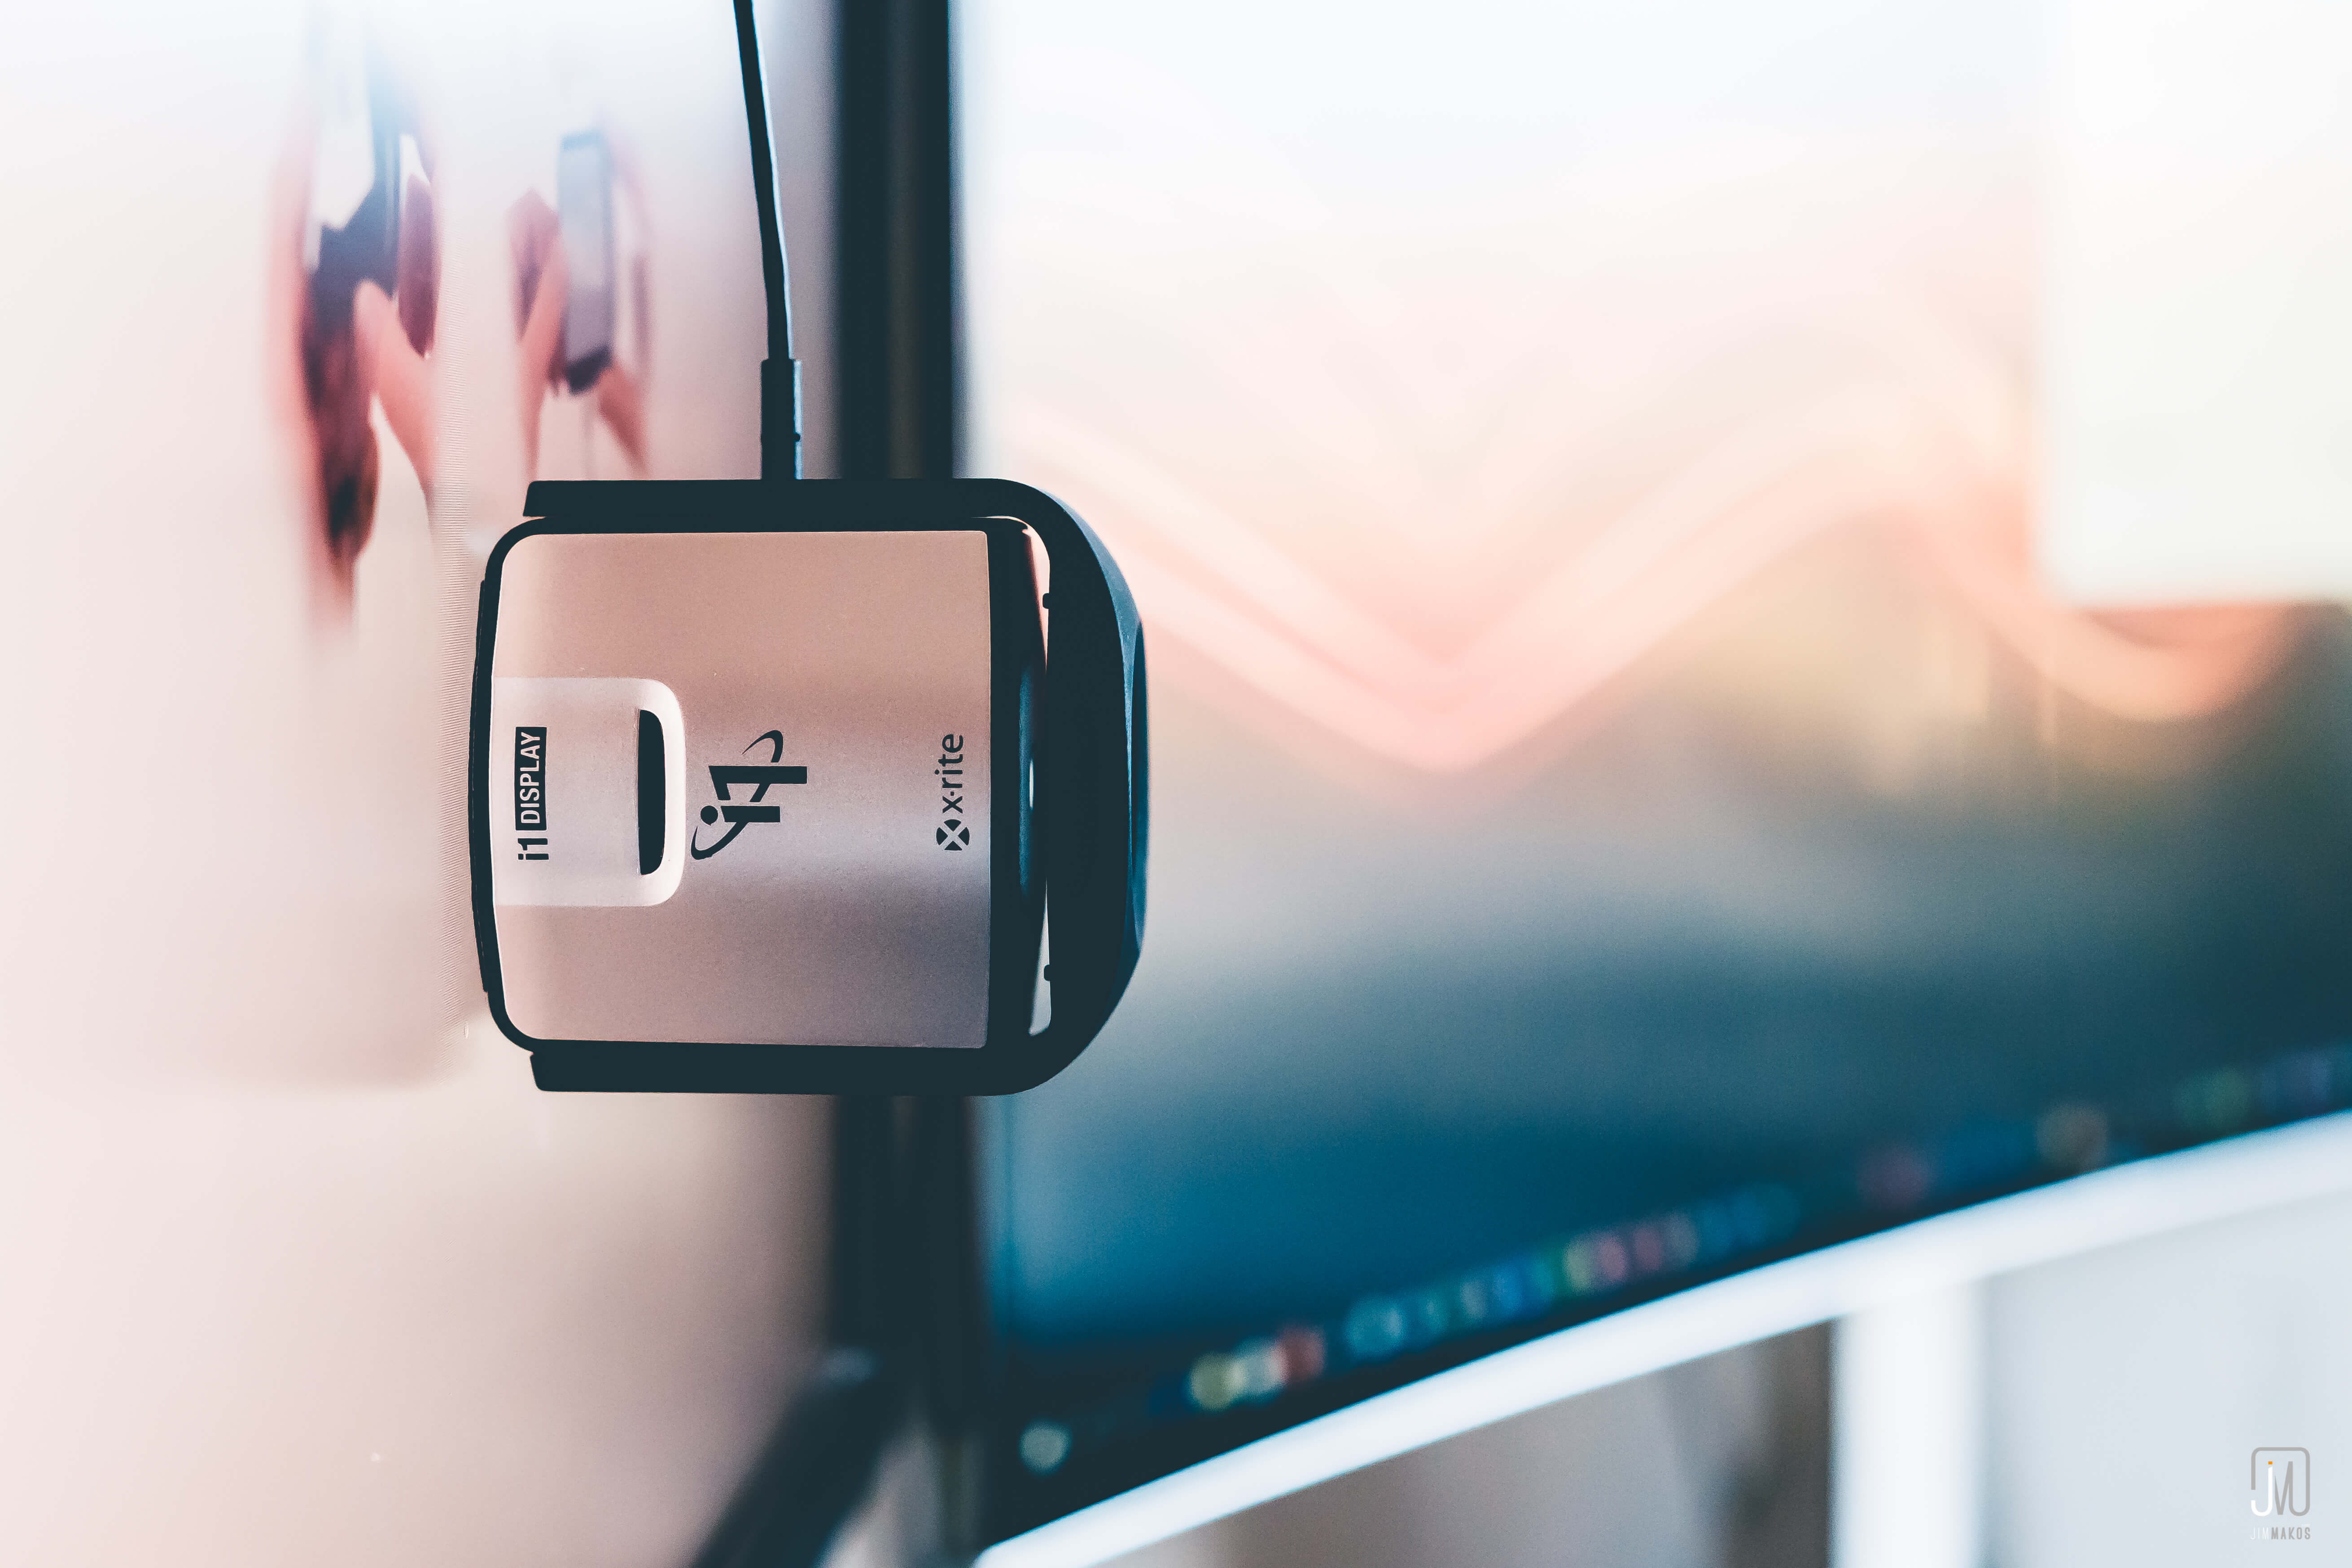
Most monitors do not get this treatment, however, as it does add cost to the monitor. You would want to use a colorimeter (or calibration device) to calibrate the monitor for accuracy, such as the popular X-Rite i1Display Pro or the Datacolor SpyderX Elite. Even some factory calibrations aren’t the best, and will need further calibration.
Between getting a high color space coverage and either excellent factory calibration or doing it yourself with a colorimeter, you can easily get most above-average monitors to be highly accurate.
Inputs and monitor I/O
Inputs are often overlooked on computer monitors, and in general aren’t terribly exciting. There are a few things to keep in mind, however.
USB ports
Quickly, let’s mention some non-video inputs. Many monitors have a built in USB hub. You can connect the monitor with a USB cable to your computer, and then have extra ports on the monitor. This removes the need to have a separate hub on your desk, or reach back behind your computer.
Most of the time these are USB 2.0 ports, however many now have USB 3.0 or even USB 3.1 gen 2 USB-C ports. Thunderbolt 3-capable USB-C ports are found on some monitors more and more, which is a boon to ultrabook, Macbook, and other users who rely on USB type C ports to chain together their peripherals and even charge their laptops.
Not all of these USB ports (not counting Thunderbolt) are powered ports, and may not be able to provide juice to certain USB devices, so keep that in mind if you plug a device in and it isn’t working as expected.
Audio and speakers
Many monitors also have built in speakers. Almost always, these are not great speakers, but it means that they can receive audio via HDMI ports, or an audio cable. Some even have a headphone out port. In general, however, monitor audio features are almost always not worth worrying about.
Video inputs
Speaking of HDMI ports, the main ports to be concerned with are these video connections. Most monitors now have multiple HDMI or DisplayPort connections, being the most common ports on computer monitors at the time. USB-C ports are finding their way onto monitors more and more as well, which is again useful to users with laptops wanting a second (or third) monitor for their laptop.
But not all HDMI or DisplayPort ports are equal. As the standards evolve and improve, more features, resolution, and bandwidth are available.
You may need specific port versions based on what you’re wanting to do. Most people won’t need to really memorize these feature sets, but it’s good information to have on hand if you’re trying to push a ton of pixels at high frame rates.
- HDMI 1.4
- Introduced May 2009
- Most common version in consumer devices
- Up to 4K at 30hz resolution support
- Adds audio return between devices such as a TV and home theater receiver, eliminating the need for a separate cable
- HDMI 2.0
- Introduced September 2013
- Expands 4K resolution up to 60hz
- Support for 21:9 aspect ratio (ultrawide displays)
- Supports up to 32 audio channels, allowing for Dolby Atmos, DTS:X, and other multichannel audio formats
- Updates HDCP copy-protection to HDCP 2.2
- HDMI 2.0a
- Introduced April 2015
- Adds support for HDR10 and Dolby Vision HDR standards
- HDMI 2.0b
- Introduced March 2016
- Adds Hybrid Log Gamma (HLG) to HDR capabilities for 4K Ultra HD broadcasting
- HDMI 2.1
- Introduced early 2017, implemented November 2017
- Only started shipping in products in 2018 in limited scale
- Supports up to 10K at 120hz (yes, you read that right, 10K!!)
- Wide color gamut (BT2020) support for 10, 12, and 16 bit color depths
- Supports variable refresh rate (G-SYNC/FreeSync)
- Can support any future HDR standards on top of currently supported formants
DisplayPort is similar to HDMI, in that it’s a more modern port. It also has little teeth that click into the port and has a release button to prevent it from being accidentally yanked out.
DisplayPort version 1.1 came out mid-2006, with 1.2 at the end of 2009. DisplayPort 1.3 was late 2014 and added 4K/8K support and also supports HDMI 2.0 features.
In March 2016 we saw DisplayPort 1.4, and is now the current standard. It added HDR10 support, new stream compression, and support for Rec 2020 color format. It can handle up to 8K/60hz, or 4K/120hz.
While a new DisplayPort version was scheduled for 2017, we didn’t see one. The upcoming version, whenever we see it, should offer uncompressed 4:4:4 video depth and up to 200Hz 4K support.
I know that these do get a bit crazy and most users won’t ever need to know this. If you buy a high end monitor, however, you’ll want to know this information at least at a broad overview level.
Thankfully, if you’re buying a 4K display, the ports will obviously be the right ones. If it’s a high bit depth monitor, the ports will be capable of carrying the bandwidth. You just need to verify that your GPU ports can match (or exceed) the monitor ports.
Monitor articulation
Another quite unsexy feature is monitor articulation, or the range of physical positioning available. Many inexpensive monitors will allow you to tilt the monitor up or down slightly, and some not even at all. But thankfully more monitors come with better options.
In addition to tilting the monitor up or down, a lot of monitor stands allow for adjusting the height of the monitor itself, allowing you to position the display in the appropriate ergonomically friendly manner for your desk setup. This is a huge benefit for almost all users.
Many monitors also allow horizontal rotation up to 90 degrees. This allows you to rotate the monitor into a portrait orientation, displaying the monitor in a tall column. Portrait mode is extremely useful for writers, coders and developers, and other users who need to read long web pages or documents.
You’ll also want a stand that is sturdy and doesn’t shake or wobble easily especially if you’re using a lighter weight desk. Larger (and therefore heavier) monitors will benefit from a good heavy duty stand and solid articulation to create a stable work environment.
VESA mounting
What if the stand that came with your monitor doesn’t put it where you need it? What if it doesn’t allow for portrait orientation rotation? Or maybe you want a cool “floating” monitor setup. How can you replace the included stand on your monitor? If your monitor has VESA mounts, you have great options!
VESA is a standards organization that helps ensure that companies stick to agreed-upon standards, and in addition to things like standardizing HDMI and DisplayPort (as well as the HDR standards previously mentioned), they also helped create a uniform mounting solution, referred to as a VESA mount.
VESA mounts are essentially four screw holes on the back of the monitor (or under the removable included stand, if it’s removable) that will allow you to put your monitor on a third party stand or monitor support arm.
There are two common mounting sizes for PC monitors, being 75mm by 75mm and 100mm by 100mm. There are other larger sizes (and some smaller), but those are usually reserved for flat panel TVs and other much larger displays.
Most monitors have at least the 100×100 mounts, and sometimes have the 75×75 as well. The majority of third party stands and monitor mounting arms have mounting plates that either have both sizes, or one plate for each size.
The common use of these mounts are for doing away with the included stand and putting the monitor on a mounting arm to help reduce desk clutter and provide more flexibility in positioning.
You can really elevate your desk setup to new heights by getting a good monitor mounting arm. There are even two, three, or four monitor mounting solutions, so no matter how you want your desk setup arranged there are many options. Just make sure your new monitor has support for VESA mounting.
Computer monitor use cases – Monitors for specific tasks
Phew. We’ve covered a ton of features and specs about computer monitors, and touched on certain features for certain use cases.
But now we finally can put all that new knowledge to good use and discuss what “kinds” of monitors there are, and what makes a good monitor for your specific needs based on for what you would want to use it.
General use/professional use computer monitors

General use (or basic home/office/professional use) monitors are basically what I referenced in the first paragraphs of this post. These are what litter your office’s cubicles and sit on the family computer desk.
For web browsing, productivity, casual gaming, and non-color-sensitive needs, monitor choice is primarily driven by size and cost, not necessarily in that order. The driving decision here is usually “How big of a monitor can I buy for the least amount of money?”
These don’t need to be super accurate, they just need to look reasonably acceptable and don’t need any crazy features. This is the predominant sort of monitor on the market, as well as what is usually purchased by most users.
For general office work or web browsing (or even very casual gaming), you won’t need to worry about monitor refresh rate, response time, input lag, or HDR. While most of these features are inconsequential for basic monitors, here’s what you’ll most likely be looking for at a minimum:
- Resolution: 1080p at a minimum of course, anything higher would be if you know you need extra workspace.
- Size: probably 23″ or 24″ at the minimum, but you may want something larger, especially if you’re insistent on a 4K display–start at 27″ if you’re going 4K.
- Panel type: Most inexpensive monitors are TN or VA. If you know you want to spend the money on a high quality monitor, an IPS panel definitely can’t hurt, but isn’t critical for casual use.
- Color accuracy: If you aren’t doing color-critical work, anything that’s not terrible out of the box will work. Preferably with a Delta E of 5 to 7 or lower.
- Aspect ratio: 16:9 is definitely the majority of monitors, but if you want more space, go with an ultrawide (21:9 etc), especially if you are contemplating a dual monitor setup–a single ultrawide can take the place of two monitors
Video editing/photo editing/color grading computer monitors

For content creators, color and accuracy is key. What you create on your system needs to translate properly to whatever your destination medium or target is. If you’re editing colors, these need to be correct.
You don’t want to adjust skin tones on a person on your monitor only to find out that everywhere else they have a pink or orange cast to the subject in the photo or video. If your monitor is too dim, it may look properly exposed on your display but way too bright everywhere else.
A good video/photo editing monitor will have an accurate color profile, wide coverage of the various color gamuts, and enough brightness to cover a decently representative dynamic range of darks and lights. This will also mean that you could easily match your monitor to a good video editing laptop for consistent editing on the go or at your desk.
- Size: 24″ would be the common minimum, 27″ or larger would be preferable
- Resolution: Again, 1080p minimum, but depending on what you work on, 1440p or 4K could be useful. 4K video editing obviously benefits from a 4K monitor to verify the final product, and photo editing can make use of extra pixels to see fine details better.
- Aspect ratio: Video editing on an ultrawide monitor is amazing thanks to more space for your timeline, tools, and playback screens. You don’t need one, but once you try you might not want to go back to a 16:9 display.
- Panel type: IPS all the way. You’ll love the more accurate panel and better brightness and contrast.
- Brightness/contrast: The brighter the better, at least 300-350 nits. The more contrast the better.
- HDR: Don’t really need this unless you’re creating HDR content. Needless to say, crucial if you are, however.
- Viewing angles: The wider the better. You won’t want to have your colors shift just because you tilt in your chair or sit slightly off-axis.
- Color accuracy: You’ll want a monitor that (preferably) ships from the factory calibrated to Delta E of 2 or less. Even if it doesn’t ship this low, many monitors can be calibrated with a colorimeter down to this range. You’ll also want something that covers at least 97% of sRGB. If you work in graphic design you’ll want the same coverage in Adobe RGB.
Response time and input lag don’t necessarily matter for editing and design. They do help improve the “feel” of the monitor, so to speak, but they won’t typically impact your work. Variable refresh rate won’t have any impact with editing unless you’re also doing heavy gaming.
Gaming computer monitors
You might think that a gaming monitor doesn’t need to be fancy, but in this day and age, gaming is a huge industry and comes with some fairly hefty technical demands for that competitive advantage in gaming.
Competitive gaming–often referred to as esports–is very frequently built around fast-paced games requiring lightning reflexes. These sort of “twitch-reflex games” are enhanced by monitors that can refresh and redraw the image more quickly, allowing you to see, react, and respond to in-game actions as fast as possible.
While color accuracy is helpful, it’s not necessarily critical to gaming, so this is often the first feature to cut out when on a budget. Higher than average brightness is definitely useful so you can avoid people hiding in the shadows waiting to frag unsuspecting users with their display settings too dark.
- Size: As usual, the bigger the better, within reason. For a regular 16:9 widescreen, a 27″ is a good sweet spot. If you’re looking at an ultrawide, the 34″ range is a reasonable size.
- Resolution: 1080p is perfectly acceptable for gaming, especially if frame rates are crucial for you. You’ll get much higher frame rates at 1080p than 1440p, and especially 4K. But if you have the CPU and GPU horsepower to push it, a 1440p monitor is the new baseline for high end gaming monitors.
- Aspect ratio: While most gaming monitors are still 16:9, ultrawides are becoming more and more popular for gaming due to the wider field of view. Seeing more of the battlefield is a strong advantage afforded by an ultrawide monitor, but pushing more pixels will reduce frame rate. Also, not all games support ultrawide resolutions, so do the research on your game(s) of choice.
- Panel type: TN panels are definitely the fastest with quick refresh rates and response times. IPS panels are catching up very quickly and look much better. VA panels are bringing up the rear on the speed front. If you can pull the cash for a fast IPS panel, do it. If not, or you need blistering speeds, stick with a high quality TN panel.
- Refresh rate: High refresh rate monitors make games look silky smooth if you’re pushing the matching frame rates. Look for at least a 120Hz panel, preferably a 144Hz if possible. You can find as 240Hz panels, but they’re fairly expensive, and mostly on TN panels with lower visual quality.
- Variable refresh rate: VRR panels aren’t mandatory, but they can help provide smoother gaming performance, especially where frame rates fluctuate wildly. This is definitely an evolving area in gaming monitors, and the prices, availability, and quality will keep getting better. Since Nvidia can now work on FreeSync panels, this option has been blown wide open with new viable choices.
- Response time: For competitive gaming or fast-paced games, you’ll want something around 1-2ms gray to gray (g2g) response times. Casual gaming can be okay up to 5ms, but anything more than that will impact gameplay.
- Input lag: For fast games and competitive play, you’ll want 7ms or less input lag. More casual play can get away with up to 14ms, and more than that will impact gameplay.
- Brightness/contrast: You’ll want a monitor that can get bright enough to accurately reproduce shadow details without losing contrast. The brighter the better, with a target of 300-350 nits.
- HDR: Gaming in HDR isn’t quite evolved yet, as not all games support it. Those that do will take a performance hit, and may not look better enough to warrant that hit. For serious gaming, it’s not necessary at this point, but will most likely change in the near future.
- Color accuracy: Not mission critical, you’ll just want something with reasonably decent colors/calibration out of the box. Delta E of 5 or less should get the job done without jumping up the cost too much.
Final thoughts
I know that it can sometimes feel overwhelming when choosing the right computer monitor for your needs, but it doesn’t have to be. Hopefully at this point we’ve given you all the help you may need to make the right choice.
Whether it’s gaming, video editing, or anything in between, there’s a multitude of great computer monitors available for you. It’s just a matter of knowing what you need and finding the best feature set for your specific needs.
Do you have any questions regarding anything we’ve covered? Anything we’ve missed? Are there any use cases for a monitor that you feel we haven’t necessarily covered? Please feel free to leave a comment below and we’ll do our best to answer your questions!
![Best laptops for video editing [2020]](https://www.creatorbeat.com/wp-content/uploads/2020/08/Video-editing-laptops-blog-265x149.jpg)
![8 Best Thunderbolt 3 docks for home, travel, and budget [2022]](https://www.creatorbeat.com/wp-content/uploads/2020/06/Best-thunderbolt-3-docks-blog-265x149.jpg)
![JayzTwoCents 30 Day Challenge – Video Editing on the Ryzen 1800X [Updated]](https://www.creatorbeat.com/wp-content/uploads/2017/03/maxresdefault-1-265x149.jpg)


0 thoughts on “The Complete Computer Monitor Buying Guide”