
OBS is arguably the most popular application for streaming video to various platforms thanks to its extensive feature set and ease of use. But getting the stream settings right can be a bit mystifying if you don’t know where to start.
Not all users will need (or be able to make use of) the same settings within OBS, so you may need to experiment with what’s best for your connection and hardware, but we can definitely get you pointed in the right direction with some easy guidelines.
Contents
How to change stream settings in OBS Studio
Locating where to change your stream quality settings in OBS is pretty simple, as the bulk of these settings are in a few easily separated menus:
- Open OBS, click File > Settings on Windows or Apple menu > Preferences in macOS (or the Settings button at the bottom right on either platform)
- Click Stream to select your streaming platform of choice
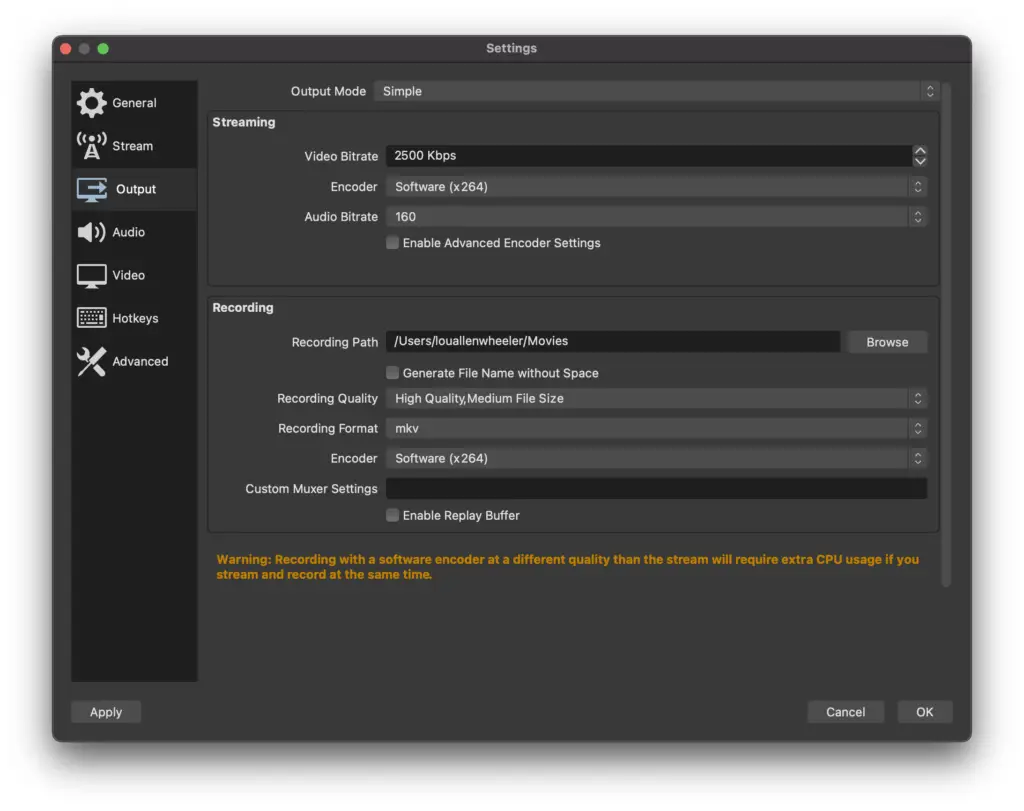
- Click Output to configure your streaming and recording quality settings. You can do this in Simple or Advanced mode with the dropdown at the top
- Click Audio to choose your audio quality settings and devices
- Click Video to choose your base (canvas) resolution and your output (scaled) resolution.
There are, of course, more settings in other menus, but these are the core settings you’ll be looking at in most scenarios.
Recommended bitrate settings for OBS
Video bitrate
Your stream’s video settings are going to be affected by two main factors: Your target streaming resolution and frames per second, and your internet upload speed. Combined, these are the two main constraints on your desired bitrate.
First, we’d suggest checking your connection’s download and upload speeds with a test like Speedtest.net or Google’s Internet speed test. This will let you know how much upload speed you have to work with and where to start setting your video bitrates.
Next, within that upload bandwidth, you’ll want to choose your target stream output resolution and frame rate (or frames per second). As we mentioned before, there’s no one best setting or bitrate, but here are our favorite guidelines for setting your bitrate:
| Stream resolution | Stream frame rate | Bitrate range |
| 1080p | 60 fps | 4500-9000 Kbps |
| 1080p | 30 fps | 3000-6000 Kbps |
| 720p | 60 fps | 2500-5000 Kbps |
| 720p | 30 fps | 1500-4000 Kbps |
If you’re streaming on Twitch and you’re not a Twitch Partner, don’t worry about setting your bitrate any higher than 6500 Kbps. Twitch streaming caps non-Partner stream bitrates and will scale anything above that limit down to fit within the max bitrate.
There’s no sense in wasting bandwidth when it won’t be used, so keep this in mind until you hit Partner. Fortunately, your bitrate won’t necessarily need to increase if you add more sources to your stream.
Adding extra scenes, desktops, or streaming cameras will all be included in the final compressed stream signal, so add all the extra camera angles your PC can handle!
Audio bitrate
Choosing the right audio settings for your stream is a bit easier, as it’s much less demanding of a stream. Whereas video bitrate can be up to 9000 Kbps or higher for a full HD stream, audio typically sits around 160 Kbps as a recommended starting point.
If you’re doing high-quality audio streaming such as music or something else more demanding audio-wise, we’d suggest bumping this up to 256 or even 320 Kbps.
Keep in mind that this will sit alongside your video bitrate bandwidth, so you could start impacting your video stream if you crank the audio bitrate too high and your overall internet speed has a lower upload speed to start with.
OBS Bitrate Calculator
While it’s a few years without an update, there is an OBS Bitrate Settings Calculator created by an OBS Studio community member, Wondible. This plugin will let you calculate the best encoder settings based on your desired output settings and internet speed.
We’d like to see it updated at some point, but with streaming becoming easier with both CPU/GPU and internet speeds becoming more capable, it may not be as useful as it once was.
Best OBS settings for streaming 1080p 60fps
Our recommended settings would start out with an internet upload speed of at least 5000 Kbps to ensure plenty of bandwidth headroom to support the higher video quality of 1080p 60fps live streaming. The higher bitrate you can upload the higher quality stream people will see.
We would also like to see the audio quality of at least 256 Kbps to provide the best sound quality to match the video.
Best OBS settings for streaming with bad internet
While this is a difficult answer to provide to everyone, there are a few easy wins to help out when streaming with a bad internet connection.
- First, reduce your video bitrate to the bottom of our recommended live streaming bitrates.
- If you’re already there, drop from 60fps to 30fps.
- If you’re still dropping frames, change your output mode to downscale to 720p.
- Try lowering your audio quality, but no lower than 128 Kbps–bad audio is worse than bad video.
- If you’re connected via wifi, try connecting directly to your router with an Ethernet cable. You may even need to try a Powerline adapter if a long cable run isn’t possible.
- Finally, try to upgrade your internet. Yes, this is an obvious answer, but if you’re serious about live streaming, we’d advise it regardless.
OBS Stream settings
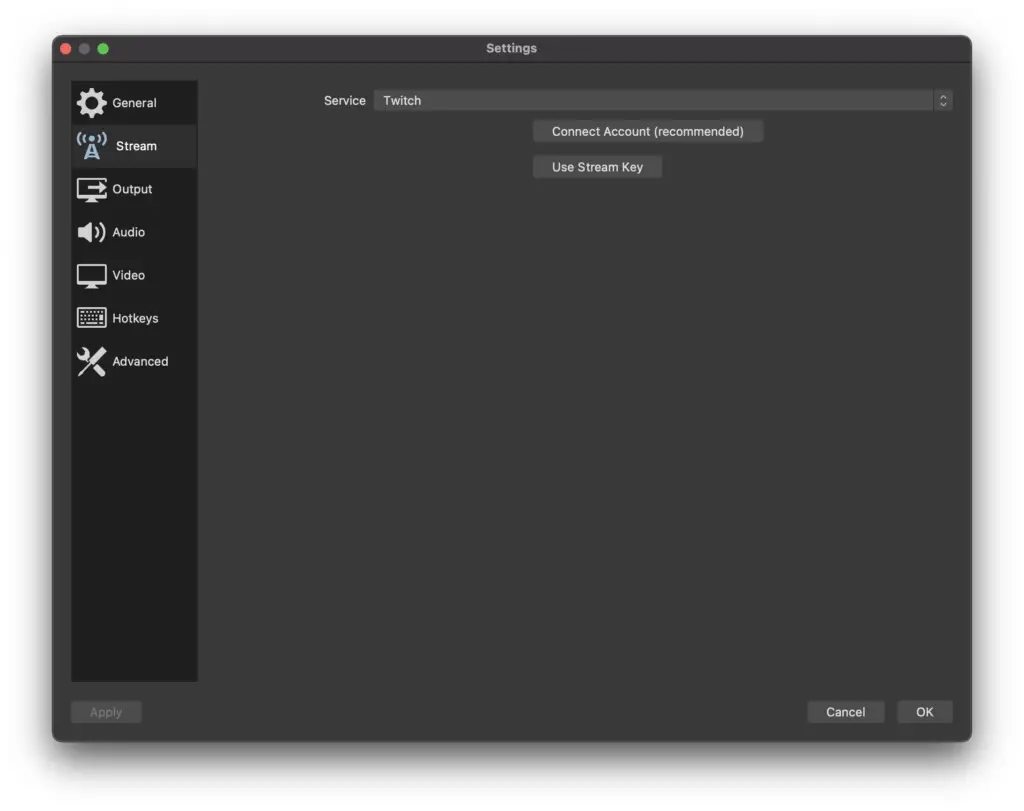
The Stream settings menu is where you choose your live streaming service. There’s an absolutely huge list of live streaming platforms available, and if your choice isn’t available you can dial in custom settings.

Most people will use the Connect Account button to pair OBS to their streaming platform of choice, but you can also use a stream key to authenticate as well.
OBS Output settings
While you can absolutely use the Simple settings we feel that it’s worth switching to the Advanced mode for a few key tweaks.
Streaming tab
In the Streaming tab we can make the majority of our settings changes:
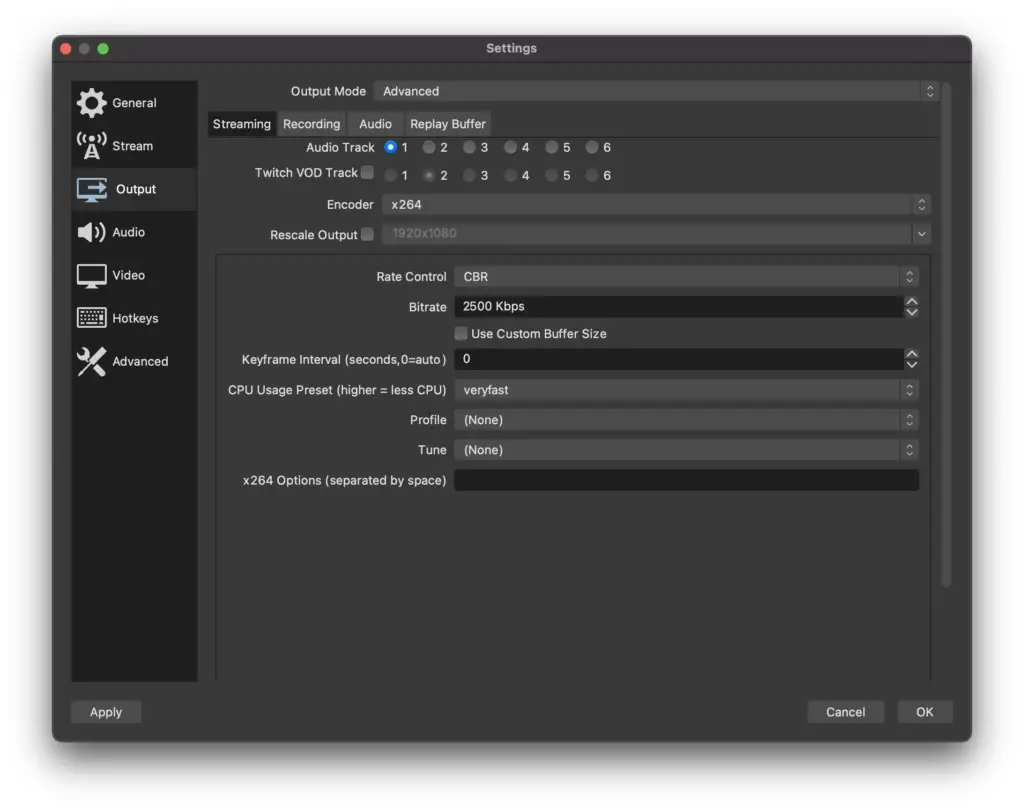
Audio Track
Set this to 1 in most instances
Encoder
Set this to NVIDIA NVENC H.264 (new) if you have this available (only available on an Nvidia 10, 20, or 30 series graphics card), otherwise, choose the x264 encoder option.
The NVIDIA NVENC encoder will reduce the load on your CPU by letting the GPU do the video encoding. This means your CPU works less, but at this point, results in slightly lesser video quality.
The x264 option will use the CPU for all encoding. This looks a bit better but may use more CPU than you’d like. If you have a high core count CPU this shouldn’t be an issue.
Note: If you’re on a Mac, do not use the Apple VT H264 Software or Apple VT H264 Hardware encoder. These are variable bitrate encoders and are best used above 10000 Kbps streams as of the time of this writing.
Rescale Output
Leave this unticked–you’ll do this in the Video menu later.
Rate control
Set to CBR, as we always want a constant bitrate–variable bitrates cause artifacts and quality drops among other visual issues.
Bitrate
Set to your desired bitrate as discussed above.
Use Custom Buffer Size
Leave this unchecked, it’s not needed for most services
Keyframe Interval
Set this to 2; this means that every 2 seconds will be a fully-rendered frame to act as a keyframe. This works to ensure that the stream does not build up delay or lag as the keyframes act as a time sync mechanism.
CPU Usage Preset
If you’re not using the NVENC GPU encoder, you can use this to control the CPU encoding. Most find that the veryfast preset is adequate, but if you have a very powerful multicore CPU you could probably set this to a slower setting.
The slower the CPU Usage Preset, the higher quality the video encoding will be, but at a higher CPU workload.
Profile
Set this to High. Not all services accept this setting, but it looks better than Main, and Baseline is, well, really not great. If your stream doesn’t work set to High, back it down to Main. You can read more about these profiles here.
Tune
Most people will leave this at None. These are used to enhance certain types of content, but it’s not terribly important for most users. You can read more about the FFmpeg implementation of this option here.
x264 Options
You most likely won’t need this. If you really want to dive deep into command-line arguments, here’s a good starting point. But again, you probably don’t need it.
Audio tab
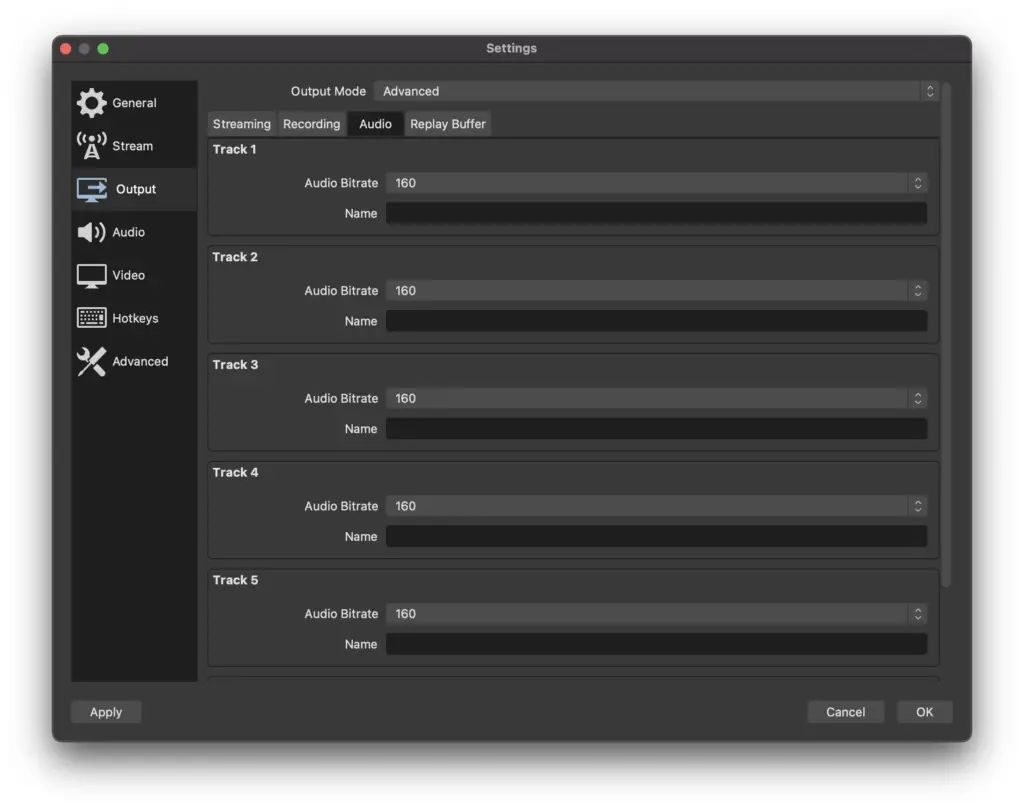
Audio bitrate
As we set the audio track to 1 on the Streaming tab, we only need to alter the Track 1 line on this screen. Set this to your desired audio bitrate.
OBS Audio settings
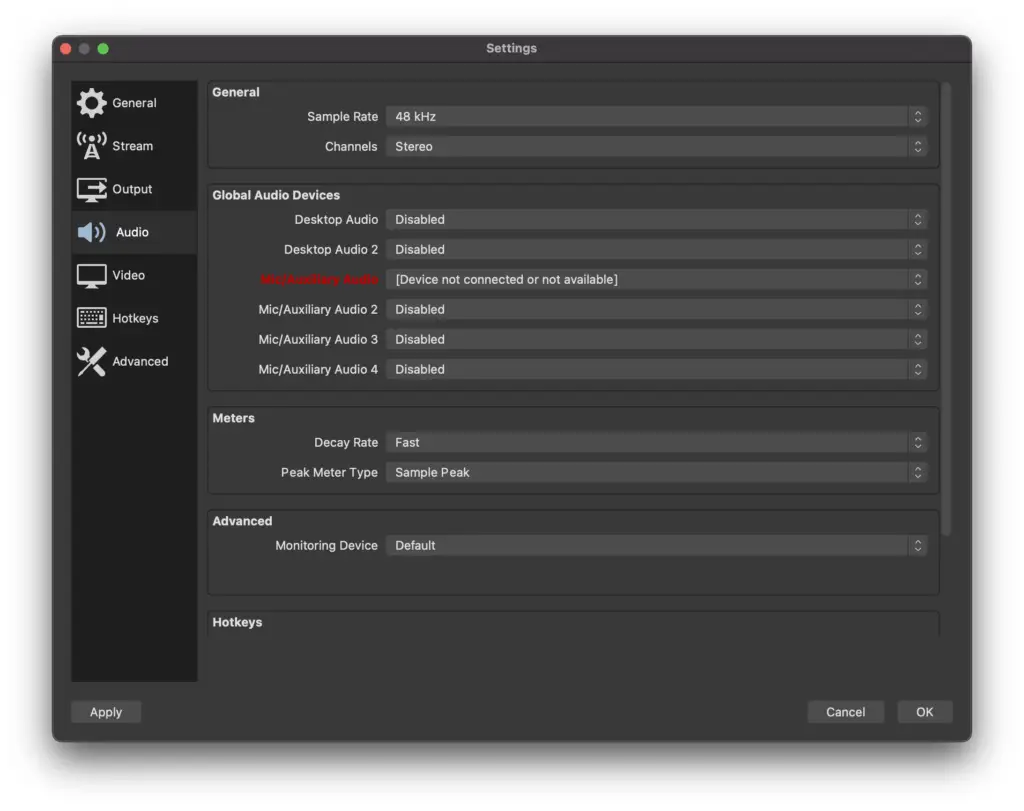
Sample Rate
Set this to 48 kHz. This will get you the best quality audio within the bitrate chosen previously. CDs are sampled at 44.1 kHz, and 48 kHz gets more data sampled in the same timeframe.
Global Audio Devices
These options for Desktop Audio and Mic/Auxiliary Audio will vary depending on your setup and your needs. This will let you set up mics as well as in-system audio sources to be fed into your stream. This may be where you set up loopback audio from audio interfaces.
Meters
The defaults should be adequate for most users.
The Decay Rate determines how fast the meters fall from whatever level they detect–slower is easier to see the peaks but less accurate to real-time peaks. We’d suggest leaving this at Fast as it will restore from temp peaks faster giving a more accurate reading second to second.
Peak Meter Type dictates the source of the meter’s peak measurements. Sample Peak is basically an estimated level, and True Peaks is a more accurate reading–but is more CPU-dependent. Unless you absolutely need accurate metering, leave this at Sample Peak.
Monitoring Device
If you want to route your stream to a certain pair of headphones or another output device, set this here. This is useful if you need to hear the stream mix but another output device doesn’t.
OBS Video settings
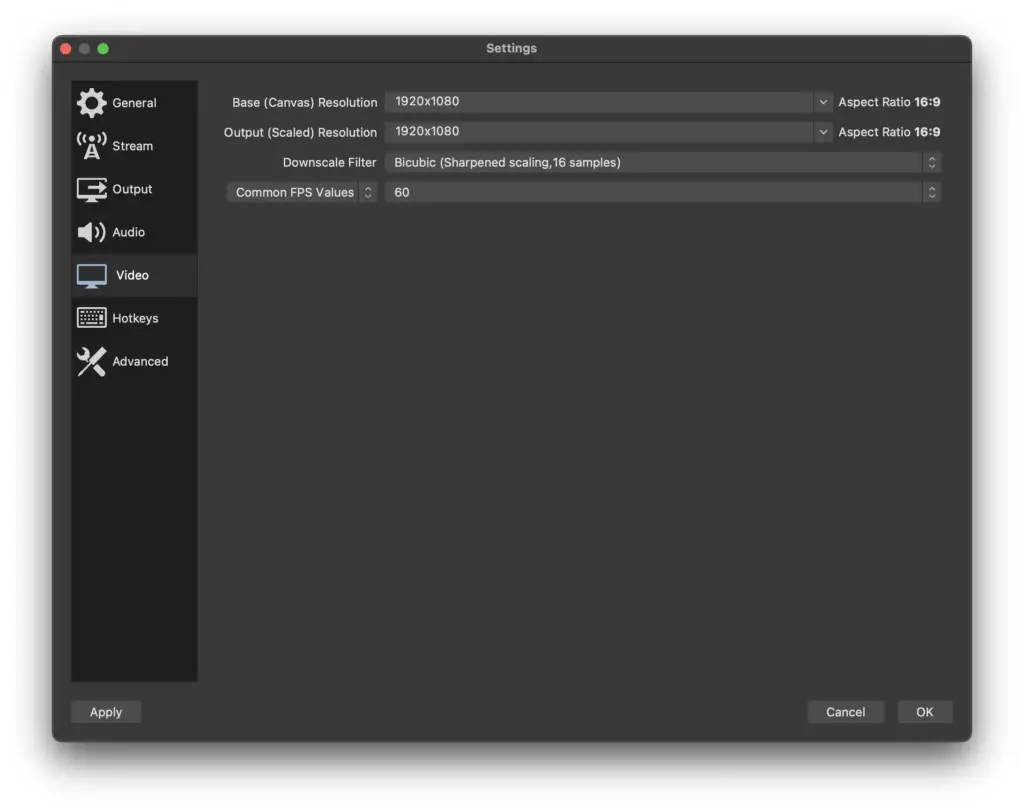
Base (Canvas) Resolution
The Base Resolution is the area of your display(s) that you wish to capture in your stream. If you’re playing a game in 1080p, set your Base Resolution to 1920×1080.
If you only want to capture a small portion of your screen (or are using another resolution somehow), you can set this to match that area.
Output (Scaled) Resolution
If the Base Resolution is the source, the Output Resolution is the target. This is the size of the stream being sent to your streaming service. This will be the effective resolution of your live stream.
If you don’t have the bandwidth for a 1080p stream and need to downscale to 720p, you would set that here to 1280×720. Otherwise, you’ll probably want this set to 1920×1080 for a full HD live stream.
Downscale Filter
These are most likely completely foreign to most users, and that’s fine. The Downscale Filter is what’s responsible for taking the Base Resolution and scaling it down to the Output Resolution.
We’d recommend the Lanczos filter for most users on a modern mid- to high-end setup with a Ryzen 5 or Intel i7 7th gen CPU along with an Nvidia 20-series or equivalent GPU.
Lower power computers should probably be on Bicubic because of the less demanding nature.
Common FPS Values
Most streams aim for at least a 60 FPS stream. We’d advise at least that, but if you have a less capable machine you may need to drop this to 30 FPS.
FAQs
What is OBS Studio?
OBS Studio, or Open Broadcaster Software, is a streaming and local recording application. OBS lets you connect your stream to any of a large number of streaming platforms, and even multiple platforms at the same time.
OBS is popular as a free and full-powered option for streaming that allows the use of multiple devices (cameras and mics) and the ability to build out custom scenes comprised of those devices and desktop screen captures.
OBS Studio vs Streamlabs
OBS is an open-source application and is the basis on which Streamlabs was built. It receives updates first and fastest and is very lean with excellent CPU usage. As a result, it doesn’t have all the extras that Streamlabs baked into their versions, such as themes/overlays, chats, and others. There are plugins, however, so it’s not impossible to extend OBS.
Streamlabs (formerly Streamlabs OBS, or SLOBS for short) is a separate for-profit software product that was built upon the open-source OBS code and then enhanced with the Streamlabs extra offerings for a monthly subscription price.
Previously called Streamlabs OBS, or SLOBS for short, they have since renamed their product to Streamlabs after a massive backlash regarding the company stealing work from another company, after which the “OBS” part was revealed to have been taken without permission from the OBS project as well.
Streamlabs offers built-in chats, overlays, a Test Stream mode, built-in Undo, and integration with the Streamlabs analytics, tipping upgrades, merch storefronts, and other monetization methods. Naturally, Streamlabs does take a percentage of your income with these methods.
What is encoding?
Encoding is the process of taking one signal or file and transforming it into another type of signal or file. In the case of streaming, it is the capture of sources such as cameras, microphones, desktop screens, and more and compiling the final output into a broadcastable stream.
This usually involves a pretty hefty amount of compression to take a large video size and reduce it to a smaller version that can be uploaded over your home internet connection.
Can you use a video capture device with OBS?
Yes, you can connect most video capture devices to your PC (or Mac) for use with OBS Studio or Streamlabs OBS. Most devices should be detected by the application and made available to be added in the Sources panel.
These can then be assigned to scenes or adjusted in the advanced OBS settings and allow you to connect a streaming camera to your OBS scene.
Final thoughts
Streaming has never been easier than with the help of OBS (and Streamlabs OBS), and with a bit of our help, you should be able to get the right OBS settings dialed in quite easily for a great live stream.
Do you have a question about something we’ve missed in this guide? Any tips to add to help fellow streamers get the best performance possible? Leave a comment down below with your thoughts!


Thanks for the information that explains a great deal. Having reached the LifeFrame page, however, I am faced with a box telling that the camera is being used by another program but not which one. Am I right in assuming that it might be one of my photo editing programs? Can antone suggest how best to find the correct one, please?
Hey there Jayme! Usually, webcams are only able to be recognized by one application at a time. If you have your camera used in Skype, for example, another app such as LifeFrame, won’t be able to use it at the same time.